
Amazon Listing Optimization Checklist: How to Audit Listings That Don’t Convert

Amazon Listing Optimization Checklist: How to Audit Listings That Don’t Convert

Amazon Listing Optimization Checklist: How to Audit Listings That Don’t Convert

Before spending more on PPC, figure out whether the real problem is traffic, conversion, positioning, or the offer.

Before spending more on PPC, figure out whether the real problem is traffic, conversion, positioning, or the offer.

Before spending more on PPC, figure out whether the real problem is traffic, conversion, positioning, or the offer.

When an Amazon listing is not generating enough sales, the natural reaction is to start changing things.

Rewrite the bullets. Replace an image. Lower the price. Increase PPC. Add more keywords.

I see brands do this all the time. Sometimes one of those changes works, but random edits usually create more noise than progress.

A listing may genuinely have a conversion problem. It could also convert well but receive almost no qualified traffic. It may rank in the top 10 for several tiny keywords while remaining invisible for the broader searches that actually drive sales.

That is why I audit the entire situation before recommending creative changes.

The goal is not to find every minor imperfection. It is to identify the few changes most likely to improve the account.

This checklist is focused on diagnosing what is wrong and deciding what to fix first. For the complete optimization process, read my Amazon Listing Optimization Guide, where I go deeper into the copy, creative, keywords, and offer behind a high-converting product page.

1. Start With the Full Catalog
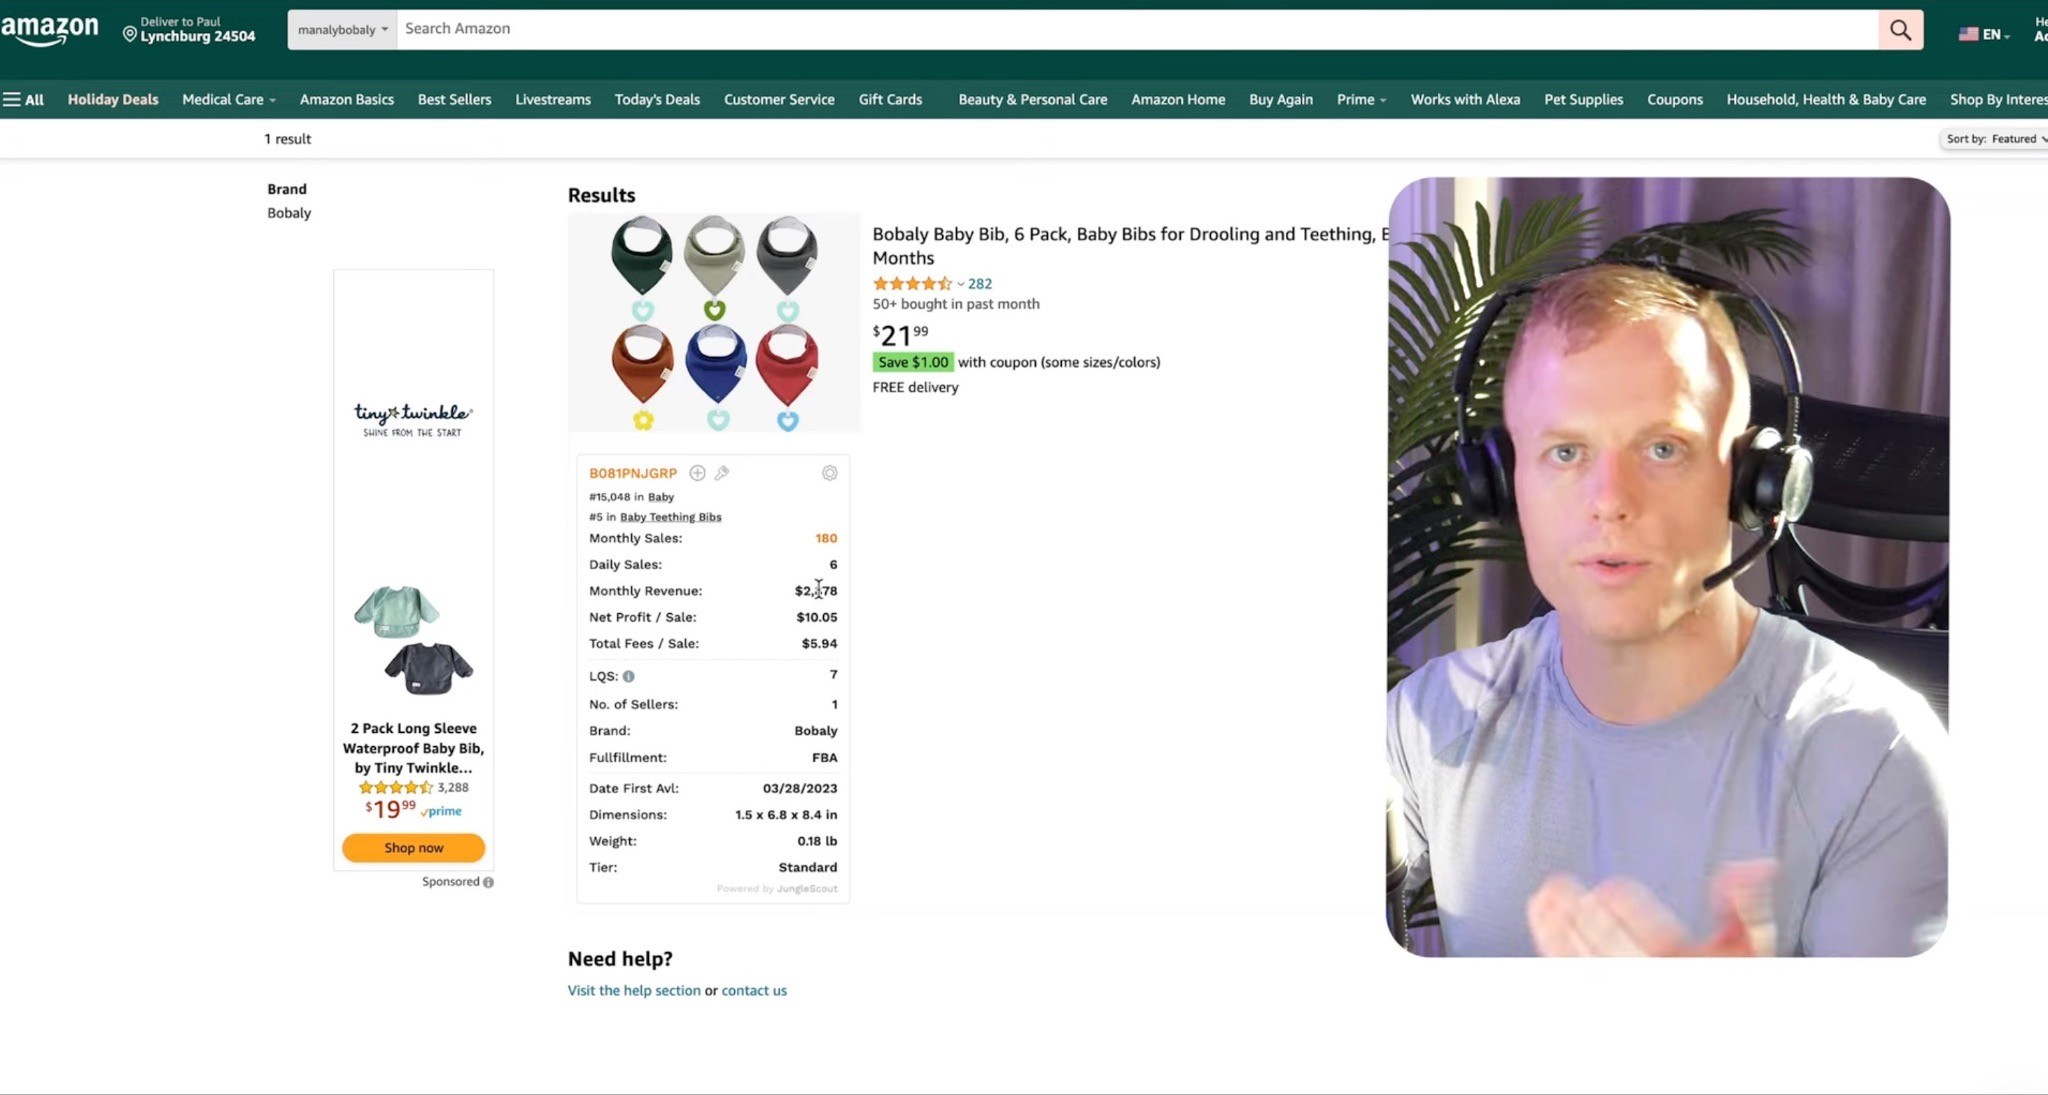

Start Amazon Listing audit with full catalog

The first thing I do is look beyond the individual product page.

From the Amazon listing, click the brand name, open the Brand Store or seller catalog, and review the full product lineup.

I then use a tool such as JungleScout to estimate the monthly sales of each ASIN. I am looking for the brand’s 80/20 product, the product generating most of the revenue or showing the clearest opportunity.

That is usually where I start.

Improving a hero product that already has demand often creates more value than polishing a low-volume ASIN with limited upside.

I also establish:

  • Is the product launching, relaunching, or established?

  • Is the goal ranking, growth, profitability, or efficiency?

  • How much inventory is available?

  • How aggressively does the brand want to grow?

A launch-stage product should not be audited the same way as a mature bestseller. Riley’s audit process begins by opening the seller’s catalog, reviewing estimated sales across the lineup, and prioritizing the highest-revenue product first.

2. Record the Main KPIs
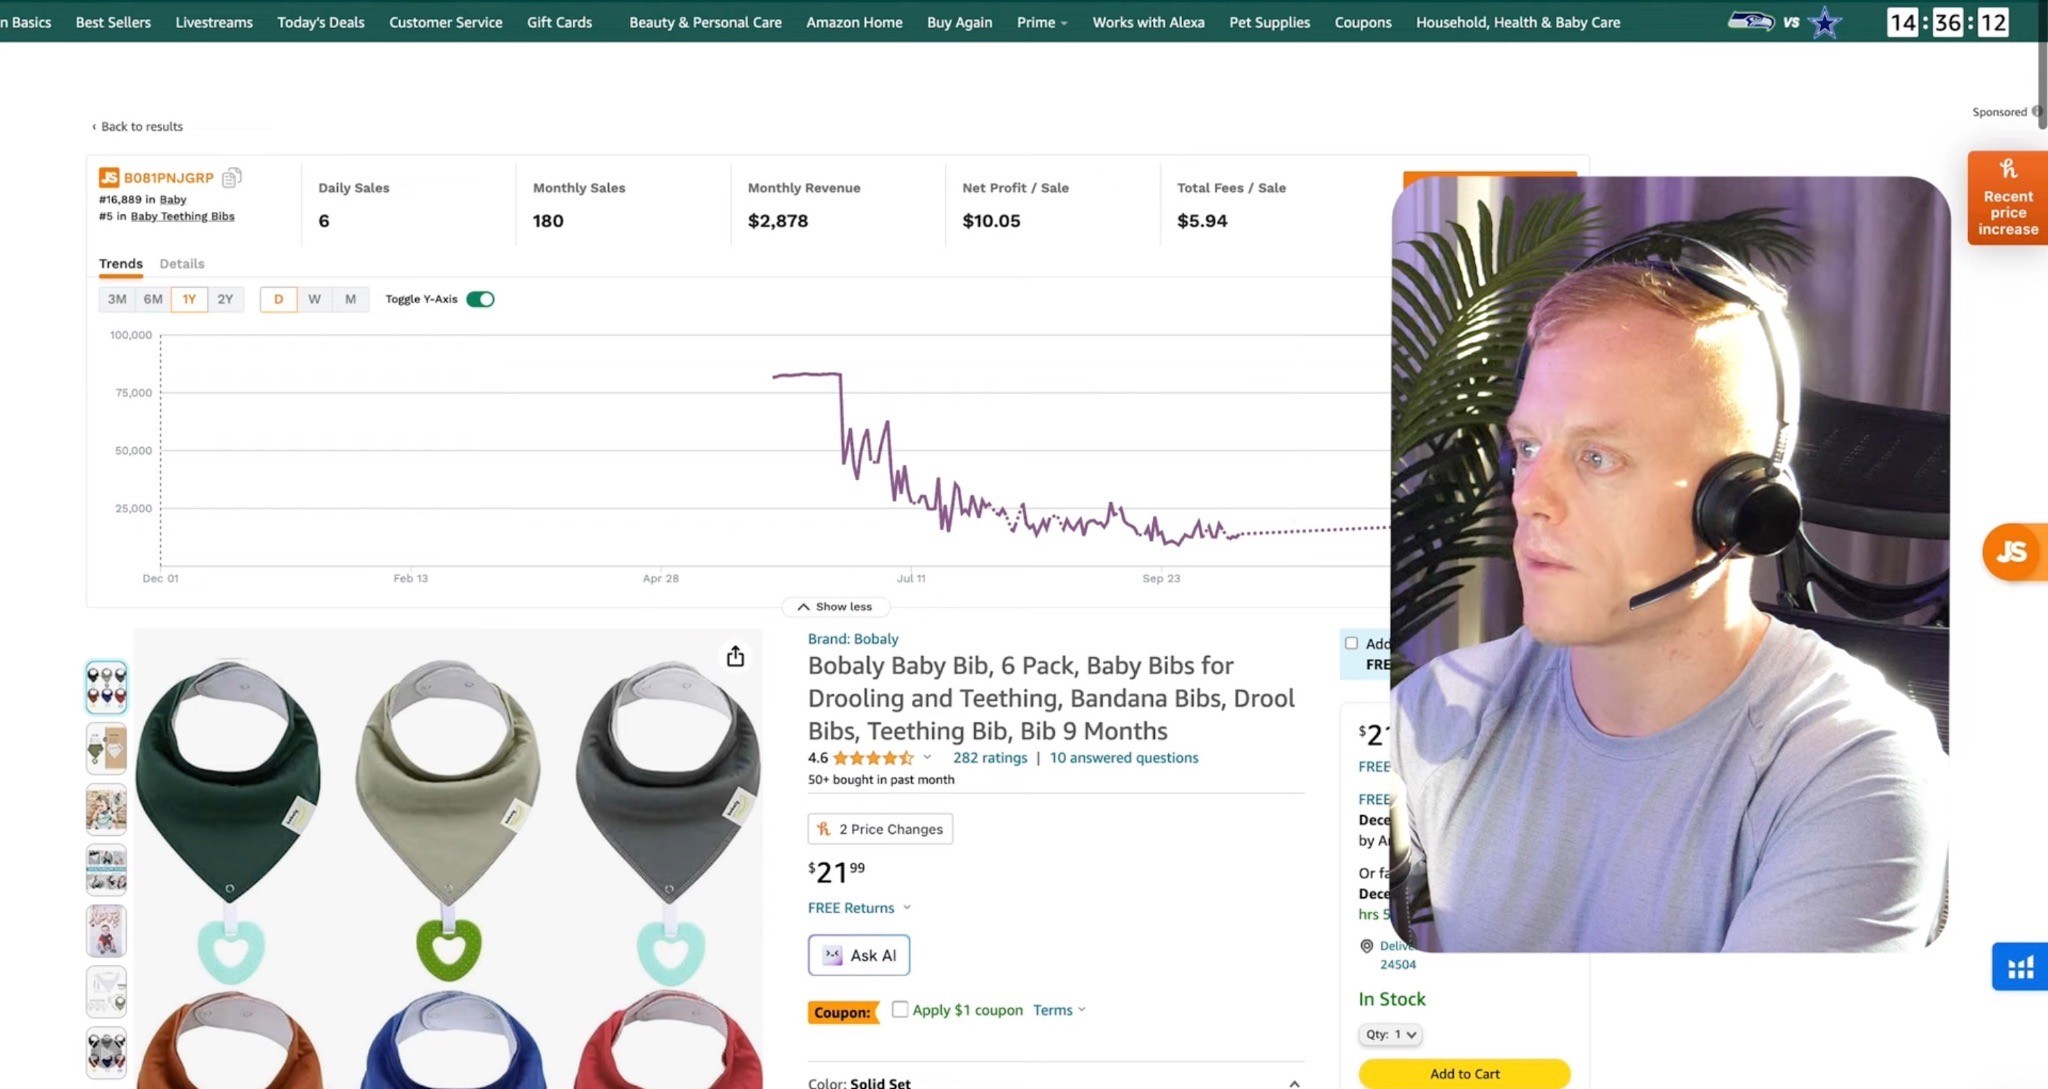

Record Main KPIs for Amazon Listing audit

Before changing the listing, I write down the account’s starting numbers.

At minimum, I want:

  • Total Amazon sales

  • Amazon ad spend

  • Advertising-attributed sales

  • ACoS

  • TACoS

  • Orders

  • Sessions

  • Conversion rate

  • Inventory position

  • Gross margin, when available

You can find most advertising metrics inside the Amazon Ads Console. Overall sales, sessions, ordered units, and conversion data can be found in Seller Central’s business reports.

To calculate TACoS manually:

Amazon ad spend ÷ total Amazon sales × 100

For example, if the account spends $1,000 on ads and generates $3,000 in total Amazon sales, TACoS is approximately 33.3%.

I treat these numbers as context, not the final diagnosis.

High ACoS may come from weak conversion, but it could also come from expensive keywords, poor targeting, an aggressive launch strategy, or limited organic sales.

The main question is:

Is this primarily a traffic problem, a conversion problem, an offer problem, or a combination of all three?

3. Audit Organic Rankings and Keyword Opportunity
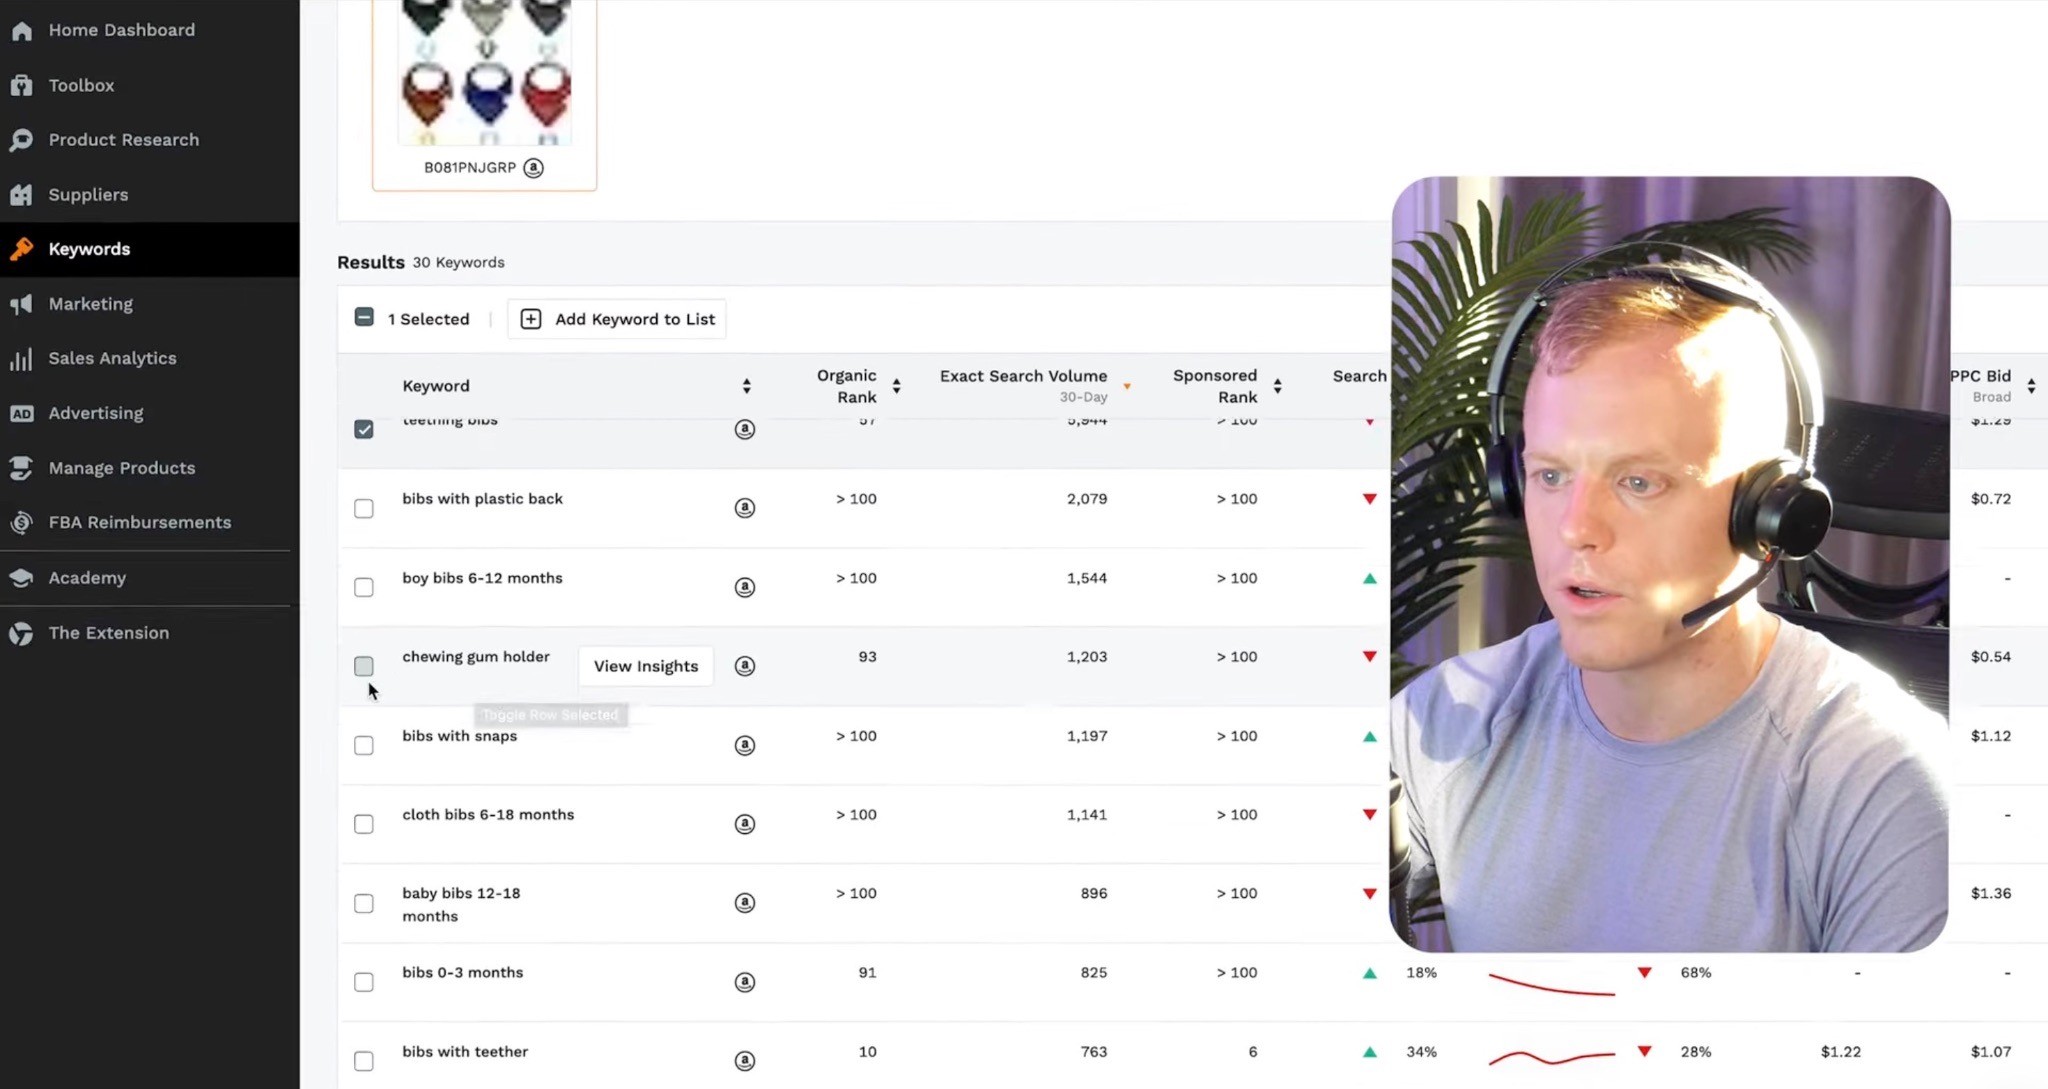

Audit Organic Rankings and Keyword Opportunity for Amazon Listing audit

Next, I check where the product ranks organically:

  1. Open the product listing.

  2. Launch the Jungle Scout Chrome extension.

  3. Open the listing’s search-keyword data.

  4. Review the organic-rank column.

  5. Compare each ranking with its estimated search volume.

I do not only ask whether the product ranks. I ask what it ranks for.

A listing may hold several top-10 positions for tiny niche searches while remaining far outside page one for the larger, relevant terms that could materially increase traffic.

I record:

  • Current top-ranking keywords

  • Their relevance

  • Their estimated demand

  • Larger terms where the ASIN ranks poorly

  • Keywords that competitors rank for but the product does not

  • Realistic opportunities rather than unrelated high-volume terms

In one of my audits, a product ranked well for narrow “bib with tether” terms, but the larger opportunity was around broader baby-bib and teething-bib searches. The listing was ranking, it simply was not ranking where most of the traffic existed. 

Compare the Winners

I then search Amazon for the primary keyword and inspect the leading products.

For each strong competitor:

  1. Open its listing.

  2. Pull its organic keyword data.

  3. Sort or review the terms with the greatest estimated demand.

  4. Note where the competitor ranks highly.

  5. Compare its pricing, reviews, images, positioning, video, and A+ Content with yours.

The goal is not to copy the competitor. It is to understand where their visibility comes from and why shoppers may choose them.

4. Measure Conversion Before Increasing Traffic


Measure Conversion Before Increasing Traffic for Amazon Listing Audit

Low sales do not automatically mean you need more PPC.

Before increasing bids or budgets, I check whether the listing converts the traffic it already receives.

Find the Overall Conversion Rate

Inside Seller Central, go to:

Reports → Business Reports → Detail Page Sales and Traffic by Parent Item

Then:

  1. Select a useful date range, ideally around 90 days.

  2. Click Show/Hide Columns.

  3. Make sure Unit Session Percentage is selected.

  4. Find the parent ASIN you are auditing.

That percentage is the listing’s overall conversion rate. It shows how many product-page sessions turned into orders.

Amazon may rename or move reports, so look for the report containing sessions, ordered units, and unit session percentage by parent ASIN. Riley demonstrates this process directly in his audit walkthrough. 

Check Keyword-Level PPC Conversion

Overall conversion can hide major differences between audiences.

Inside the Amazon Ads Console, review the campaign’s search-term data or pull a Search Term Report. Look at:

  • Customer search term

  • Clicks

  • Orders

  • Sales

  • Spend

  • Conversion rate

  • ACoS

This shows whether the product converts for specific keywords rather than only as one blended average.

The diagnosis is simple:

  • Weak overall conversion: Improve the listing, offer, reviews, pricing, or targeting first.

  • Healthy conversion but low sessions: More qualified traffic may be the opportunity.

  • Some keywords convert while others fail: Relevance or targeting is likely the issue.

  • Branded searches convert but non-branded searches do not: The listing probably needs clearer differentiation for new shoppers.

Do not judge a keyword from two or three clicks, and do not use one universal conversion benchmark. Category, price, reviews, traffic source, seasonality, and brand recognition all matter.

I cover the wider strategy behind this in my Amazon Conversion Rate Optimization Guide, including how your main image, gallery, messaging, reviews, offer, and A+ Content work together after the shopper clicks.

5. Audit the Price, Offer, Reviews, and Rating
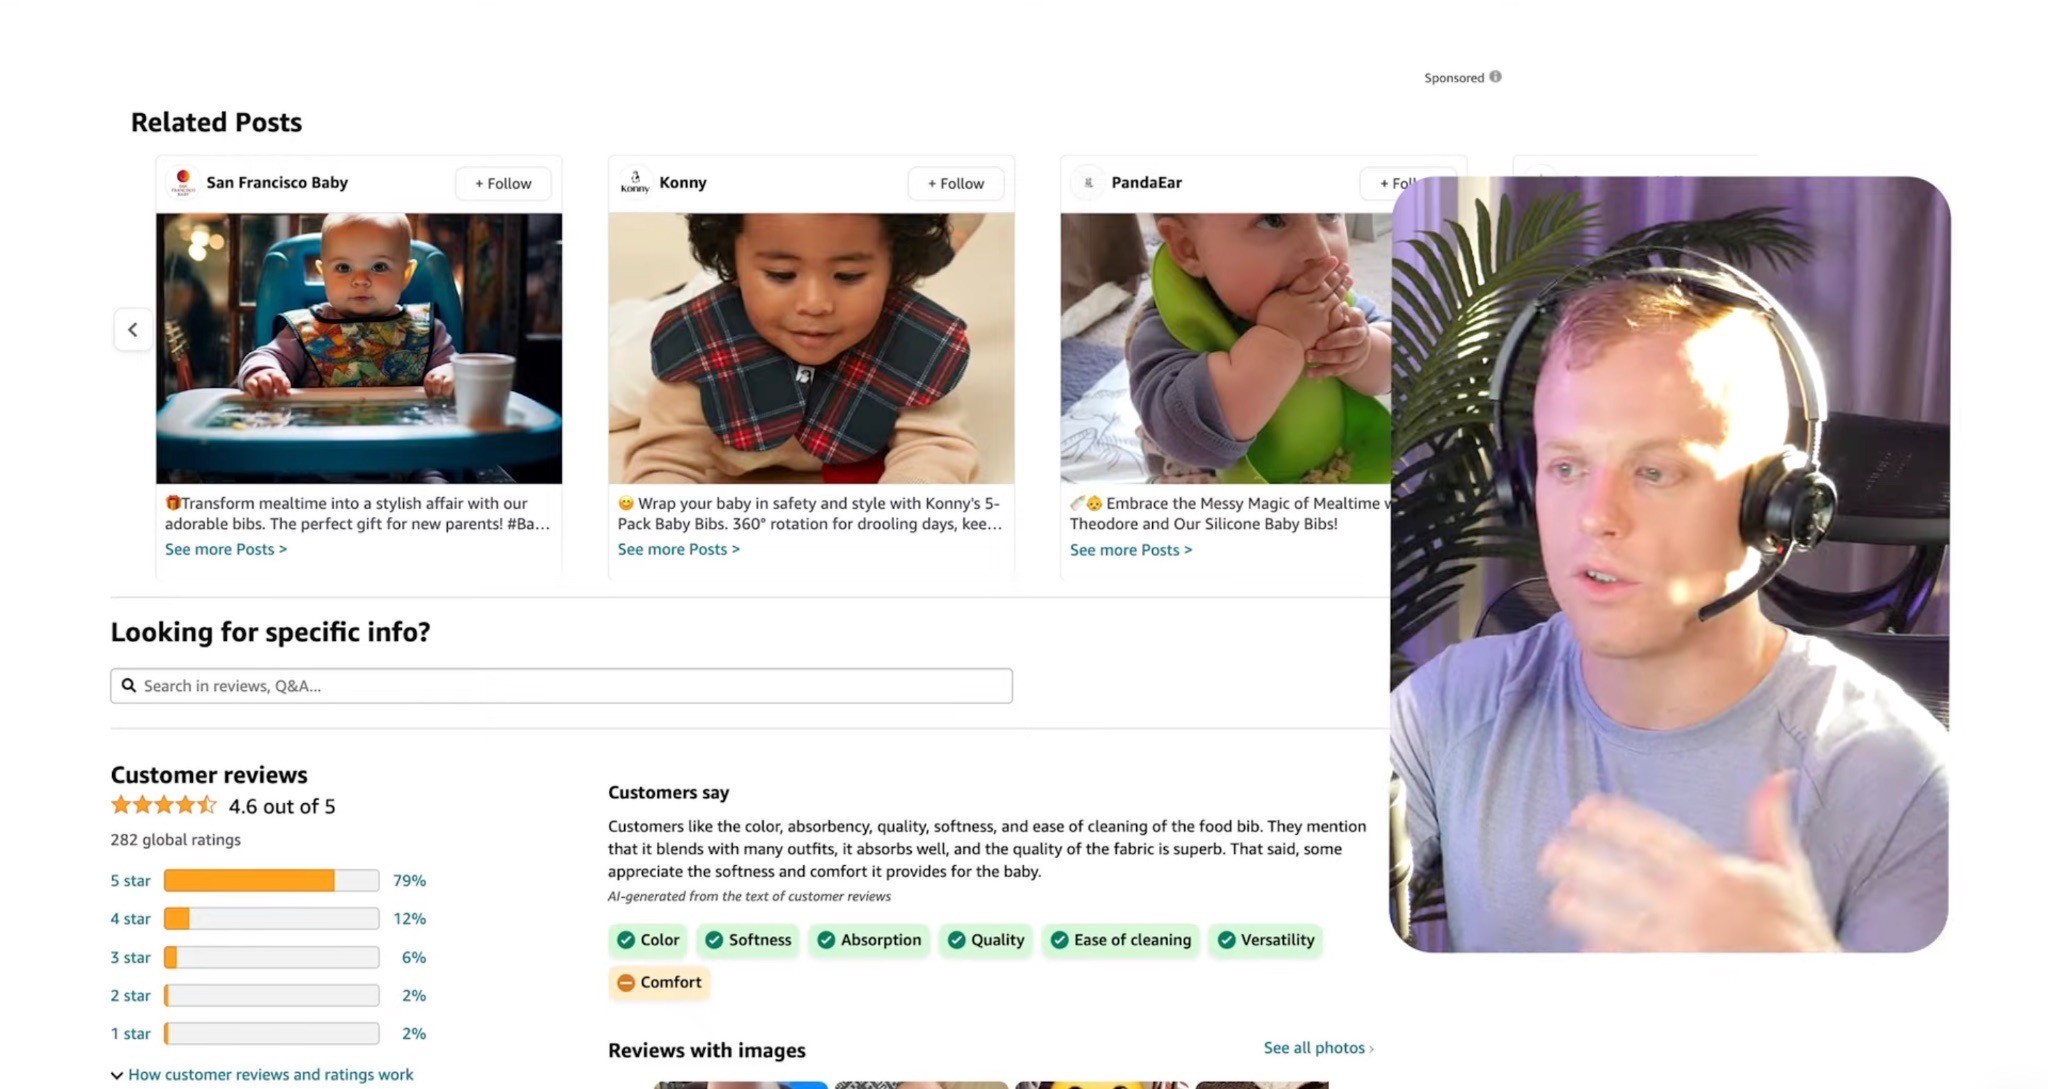

Audit the Price, Offer, Reviews, and Rating for Amazon Listing Audit

If shoppers reach the page but do not buy, I audit the offer.

Compare the Real Price

Search the main keyword and compare the product with the listings surrounding it.

Do not look only at the sticker price. Record:

  • Price

  • Quantity

  • Cost per unit or serving

  • Included accessories

  • Coupon or discount

  • Subscribe & Save

  • Delivery speed

  • Warranty or guarantee

A premium product can convert well when the listing makes the extra value obvious.

The issue is when a product costs more but looks nearly identical to a cheaper competitor.

I may recommend testing a lower launch price, but only after considering margins, cash flow, inventory, and ranking goals. You do not want to lower the price so aggressively that the brand stocks out.

Read the Reviews Like Customer Research

I review both the audited product and its leading competitors.

I look for:

  • Repeated complaints

  • Frequently praised benefits

  • Confusing features

  • Product-quality concerns

  • Reasons customers switched brands

  • Common questions the listing does not answer

Those themes should inform the bullets, gallery, comparison graphics, video, and A+ Content.

Use compliant review-generation methods only.

6. Audit the Value Proposition

Audit the value proposition for Amazon Listing Optimization

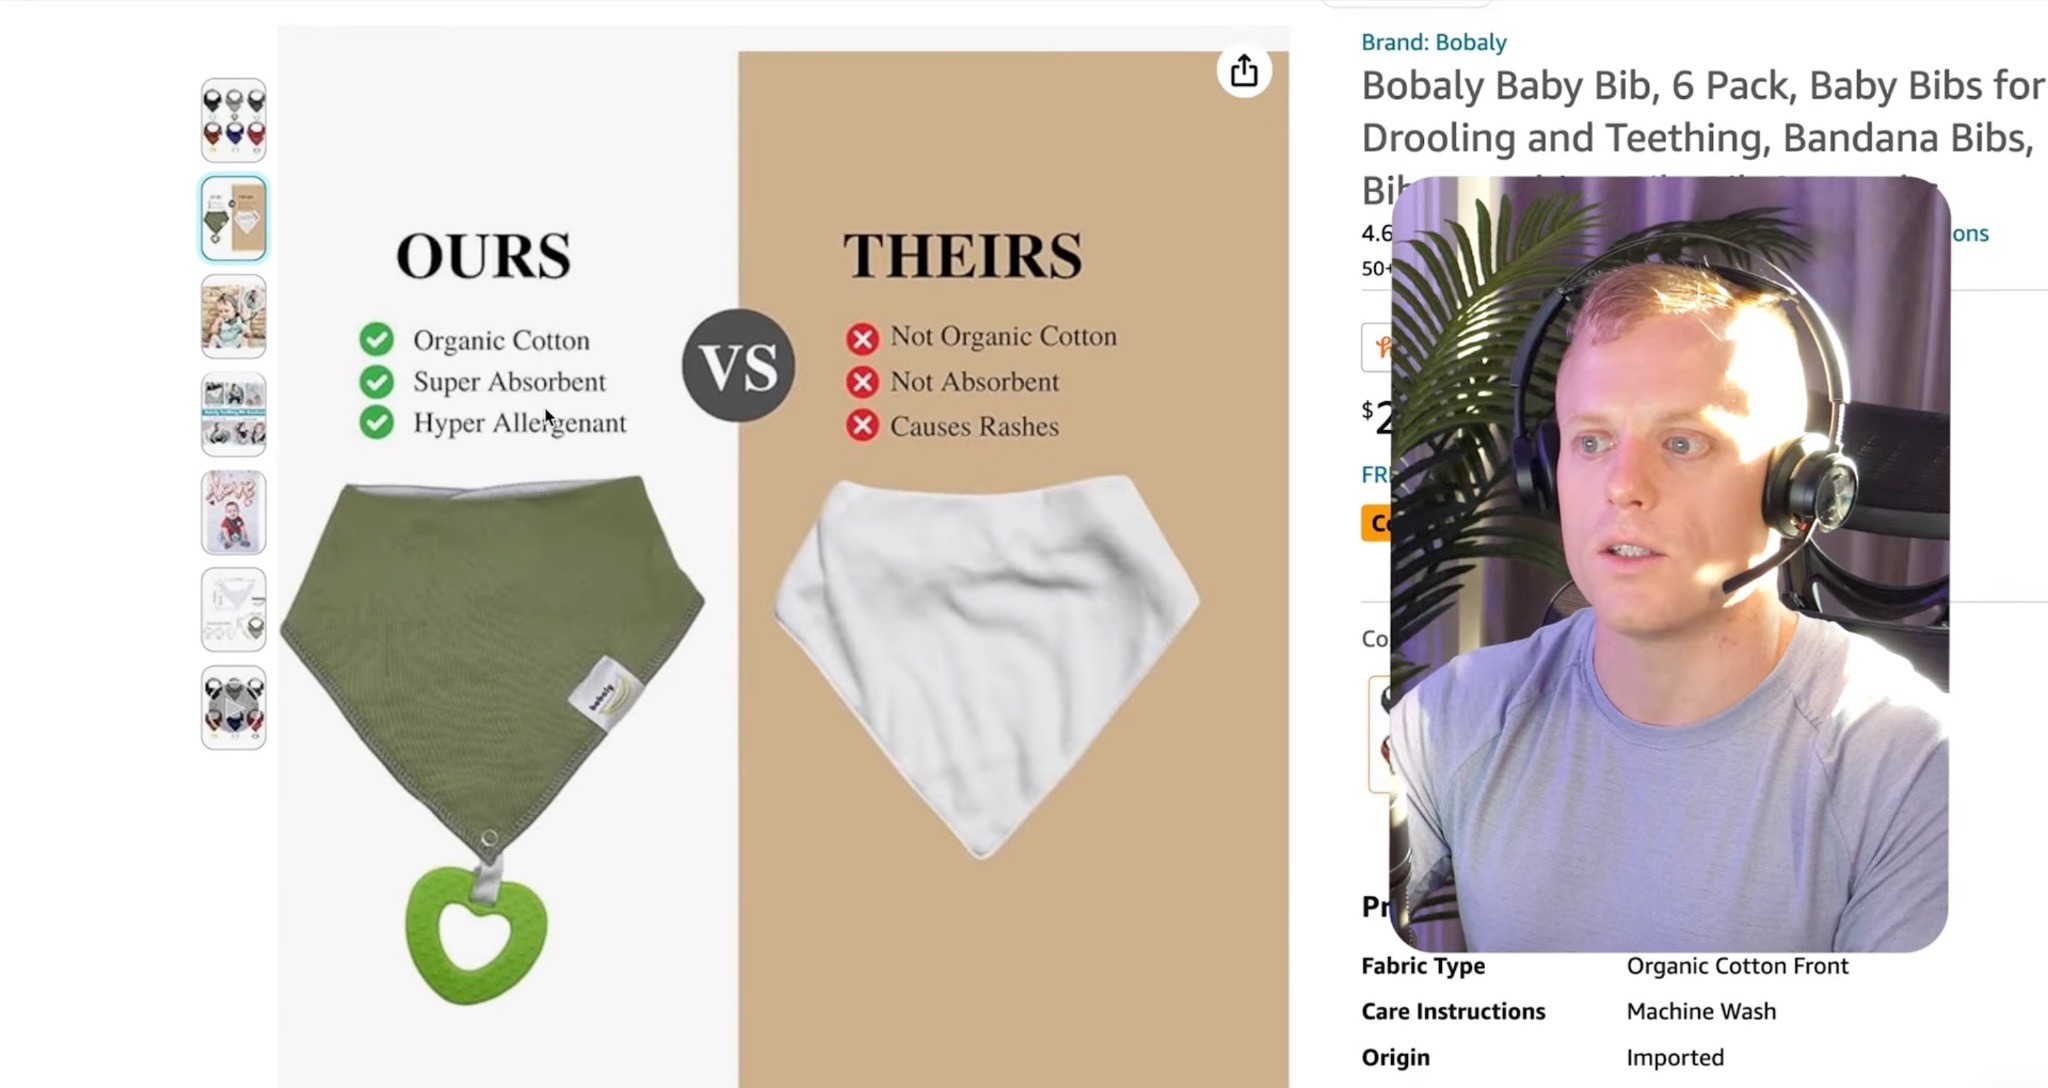
A shopper should understand four things very quickly:

  • What the product is

  • Who it is for

  • What makes it different

  • Why they should choose it over the alternatives

A lot of listings explain the category but never explain the advantage.

For example, a mushroom coffee brand may spend the entire page explaining why mushroom coffee is useful. But the shopper already searched for mushroom coffee.

The real question is:

Why should I buy this one instead of the other products on the page?

I look for that answer across:

  • Main image

  • Title

  • Bullet points

  • Gallery images

  • A+ Content

  • Comparison modules

  • Video

  • Brand Story

The message should stay consistent.

When every section emphasizes something different, the product becomes harder to understand.

My audit approach consistently prioritizes clear, simple, USP-focused messaging.

A useful test is:

Could a shopper explain why this product is different after looking at the listing for ten seconds?

When the answer is no, the problem is usually not a lack of information. It is a lack of hierarchy.

7. Audit the Main Image and Gallery

The main image determines whether the shopper clicks.

The gallery helps determine whether they buy.

Main Image Checklist

Audit Main image for Amazon Listing Optimization

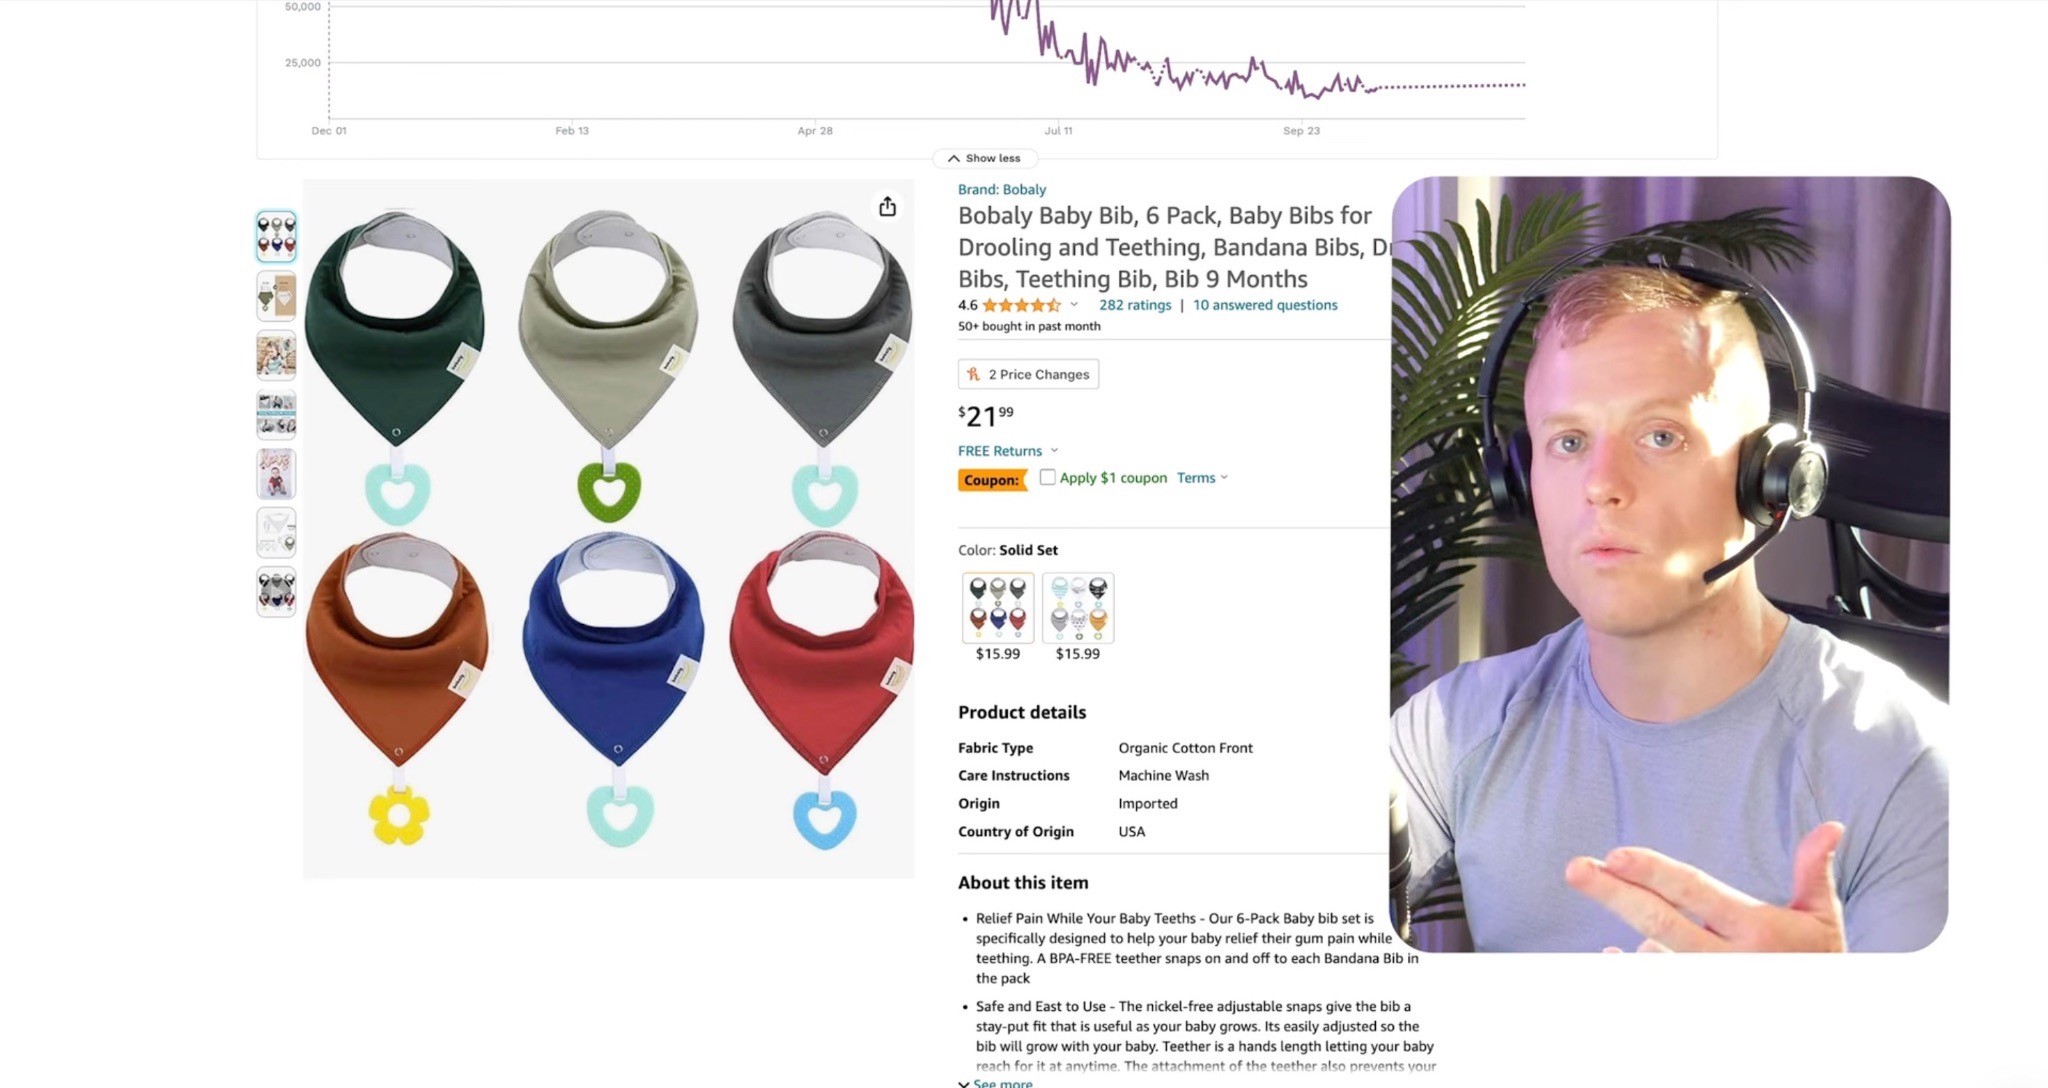
I check whether the main image:

  • Makes the product immediately recognizable

  • Works at thumbnail size

  • Uses the available frame effectively

  • Looks competitive beside the top listings

  • Makes important packaging details readable

  • Avoids unnecessary clutter

  • Accurately represents the product

  • Follows current Amazon requirements

Always review it in search results and on mobile, not only at full desktop size.

The main image deserves its own testing process because it affects whether shoppers ever reach the listing. I break that down in my Amazon Main Image Optimization Guide.

Gallery Checklist


Audit Gallery for Amazon Listing Optimization

Each gallery image should have one clear job.

I look for coverage of:

  • Main benefit

  • Key differentiators

  • Important features

  • Size or quantity

  • How the product works

  • Use cases

  • Ingredients or materials

  • Trust signals

  • Comparison information

  • Common objections

  • What is included

When one image contains a headline, five paragraphs, several icons, and multiple claims, shoppers usually process none of it.

Clarity beats information overload.

8. Audit Photography, Video, and A+ Content

Audit Video and A+ Content for Amazon Listing Optimization

I think about strong listings through five broad pillars:

  • USP-focused

  • Simple

  • Strong photography

  • Strong video

  • Consistent branding

That is the same framework Riley uses when scoring a listing and giving the brand clear next actions. 

Photography

Review whether the listing has:

  • Clear product shots

  • Lifestyle photography

  • In-use imagery

  • Close-up details

  • Scale references

  • Packaging views

If the listing relies entirely on product renders or basic infographics, professional lifestyle photography may be one of the largest opportunities.

Video

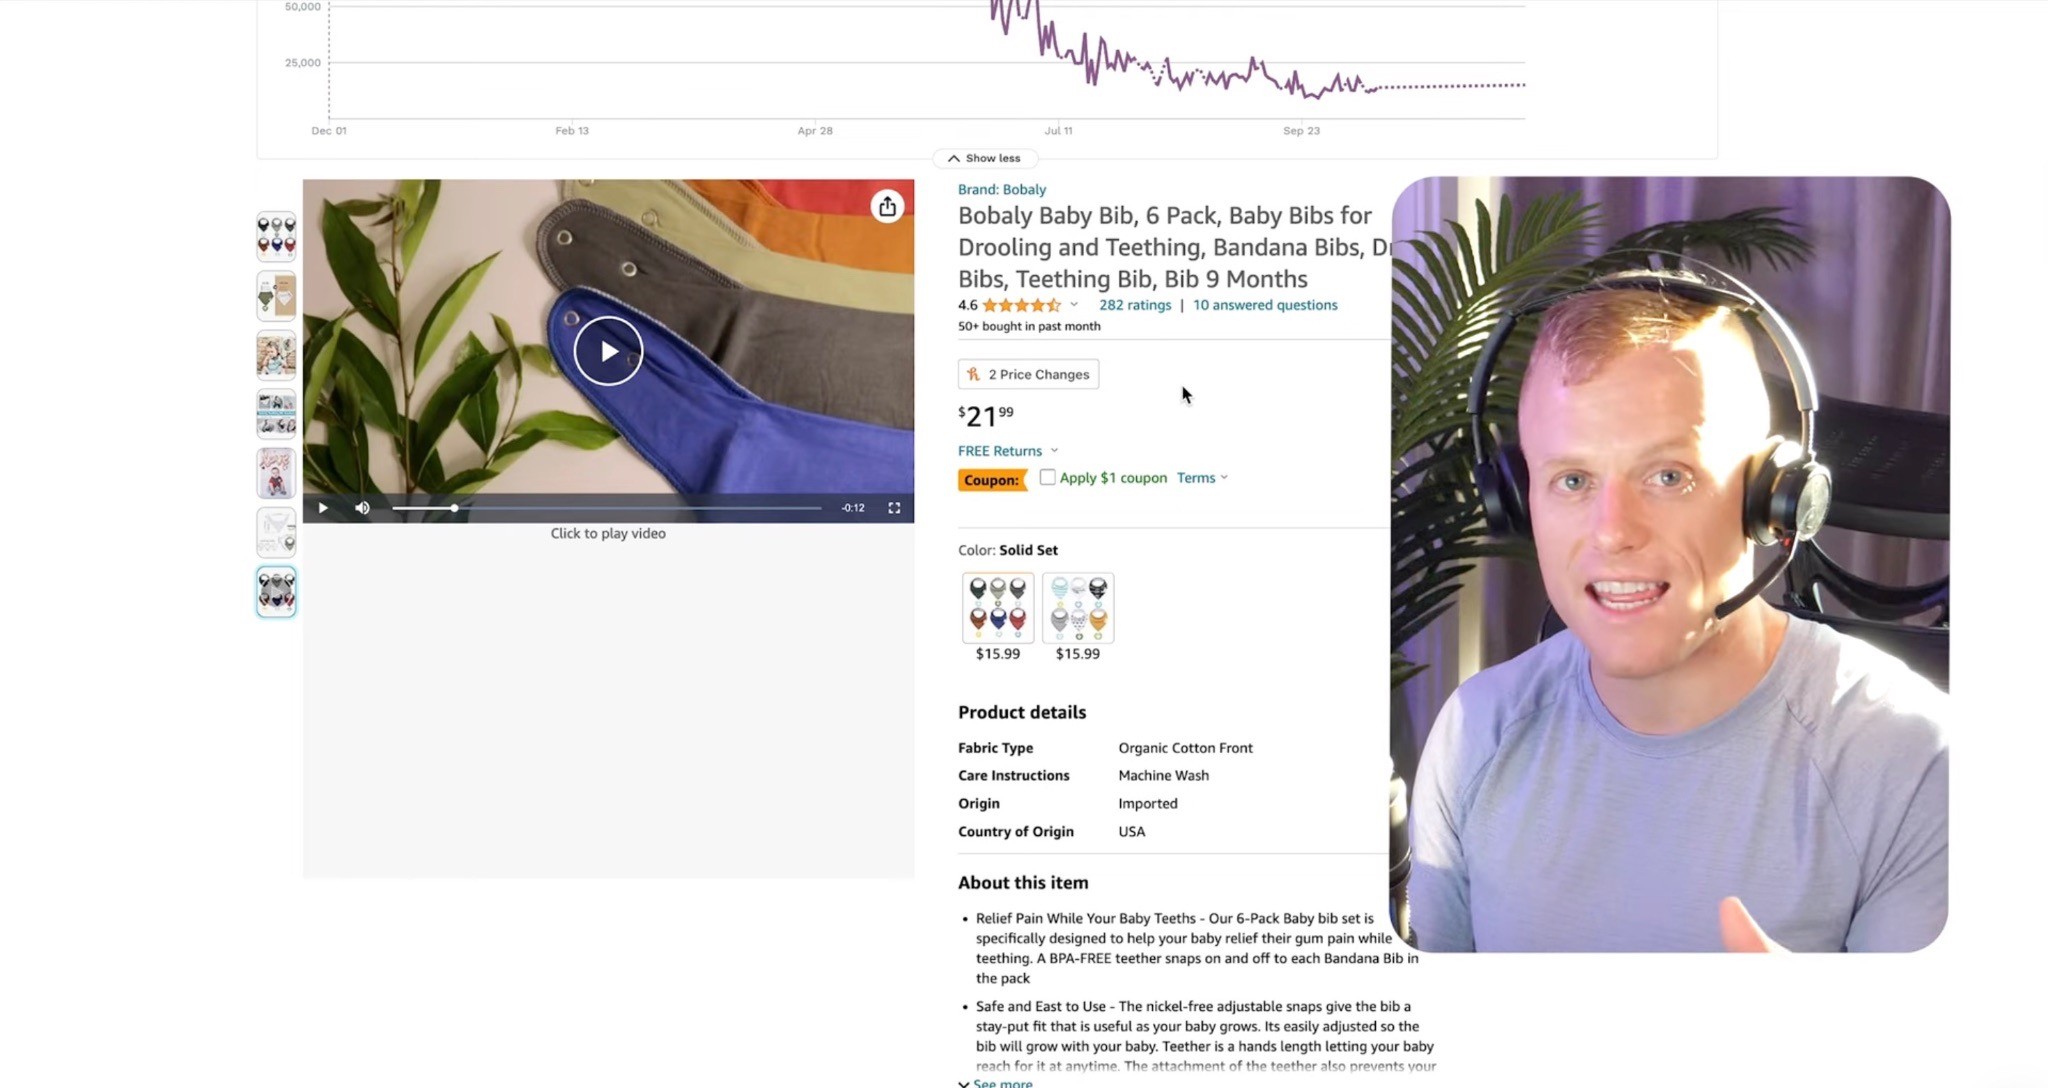
Riley’s audit process looks for three useful video types:

  • Featured video: A concise commercial-style overview that sells the product quickly.

  • Long-form video: A deeper explanation, demonstration, founder walkthrough, recipe, setup guide, or mini-infomercial.

  • Customer-facing video: Authentic content showing how the product fits into real life, provided and used in compliance with Amazon’s current policies.

A polished commercial is useful, but the brand can also record a simple founder video explaining why the product was created, how it works, and why it is different.

A+ Content


Amazon Premium A+ Design Vybrance Labs

Scroll through the entire A+ section and ask:

  • Does it reinforce the main USP?

  • Does it explain why the product is different?

  • Is the text readable on mobile?

  • Does it answer common questions?

  • Does it handle objections?

  • Does it show the product in use?

  • Does the comparison content help shoppers decide?

  • Does it match the brand’s gallery and packaging?

Do not add A+ Content merely to fill the page. Every module should move the shopper closer to a decision.

This audit is only meant to identify whether A+ Content is a major weakness. For the full module strategy, layout considerations, and content approach, read my Amazon Premium A+ Content Guide.

9. Decide Whether Traffic Is Actually the Problem

Only after reviewing conversion, offer, messaging, and creative do I decide whether the account needs more traffic.

I check:

  • Is the listing converting qualified visitors?

  • Does it rank for meaningful keywords?

  • Are PPC campaigns targeting the right searches?

  • Are converting campaigns running out of budget?

  • Is there enough inventory to support growth?

  • Is the listing ready for more traffic?

My preferred order is:

  1. Optimize the listing.

  2. Confirm that it converts.

  3. Improve organic ranking and PPC traffic.

  4. Consider external traffic only when the listing and offer are ready.

Driving more traffic to a weak listing usually makes the problem more expensive.

At the same time, repeatedly redesigning a listing that already converts well may be less valuable than improving visibility.

10. Turn the Audit Into an 80/20 Action Plan


Turn the Amazon Listing Audit Into an 80/20 Action Plan

I do not finish an audit with a list of 40 unrelated problems.

I identify the few actions most likely to matter and organize them into a 90-day game plan.

For each recommendation, record:

  • The issue

  • Why it matters

  • Expected impact

  • Difficulty

  • Owner

  • Deadline

  • Metric to monitor

Then prioritize the work.

First 30 Days

Fix immediate blockers such as:

  • Unclear positioning

  • Weak main image

  • Missing gallery information

  • Uncompetitive offer

  • Poorly targeted PPC

  • Important unanswered objections

Days 31–60

Complete larger improvements such as:

  • New photography

  • Gallery redesign

  • Video production

  • A+ Content

  • Copy updates

  • Keyword and campaign restructuring

Days 61–90

Measure the changes, review conversion and rankings again, and increase qualified traffic where the data supports it.

That is the 80/20 approach: fix the biggest constraint first, measure what happened, and then move to the next highest-impact opportunity.

When the audit shows that the entire page needs work rather than one isolated fix, our Amazon Listing Optimization service covers the strategy, messaging, copy, main image, gallery, and A+ recommendations as one connected project.

Quick Amazon Listing Audit Checklist

Before making major changes, review:

Business: Priority ASIN, lifecycle stage, goals, sales, ad spend, ACoS, TACoS, inventory, and margins.

Traffic: Organic rankings, keyword demand, competitor visibility, PPC coverage, and traffic quality.

Conversion: Sessions, ordered units, unit session percentage, and keyword-level PPC performance.

Offer: Price, quantity, reviews, rating, coupons, delivery, and value versus competitors.

Listing: Main image, gallery order, USP, title, bullets, photography, video, A+ Content, mobile readability, and brand consistency.

Action plan: The top three fixes, who owns them, and what should happen over the next 90 days.

What Should You Fix First?

The answer will be different for every product.

Some listings need stronger images. Others need clearer positioning, a better offer, more relevant traffic, or improved keyword targeting.

The mistake is assuming the listing needs more traffic before proving it can convert the traffic it already receives.

A proper Amazon listing audit gives you a diagnosis instead of a collection of guesses.

Start with the business data. Review rankings and conversion. Evaluate the offer, messaging, creative, and trust. Then decide whether traffic is actually the constraint.

Once you know the real problem, the process becomes much simpler:

Fix the biggest issue first, measure the result, and move to the next highest-impact opportunity.

Need a Professional Amazon Listing Audit?

At Amazing Creative, we help Amazon brands identify the positioning gaps, creative weaknesses, and conversion issues holding their listings back.

We review the listing, images, messaging, A+ Content, offer, and wider conversion strategy before recommending what to fix first.

Explore our Amazon Listing Optimization service for a deeper breakdown of how we improve underperforming listings.

When an Amazon listing is not generating enough sales, the natural reaction is to start changing things.

Rewrite the bullets. Replace an image. Lower the price. Increase PPC. Add more keywords.

I see brands do this all the time. Sometimes one of those changes works, but random edits usually create more noise than progress.

A listing may genuinely have a conversion problem. It could also convert well but receive almost no qualified traffic. It may rank in the top 10 for several tiny keywords while remaining invisible for the broader searches that actually drive sales.

That is why I audit the entire situation before recommending creative changes.

The goal is not to find every minor imperfection. It is to identify the few changes most likely to improve the account.

This checklist is focused on diagnosing what is wrong and deciding what to fix first. For the complete optimization process, read my Amazon Listing Optimization Guide, where I go deeper into the copy, creative, keywords, and offer behind a high-converting product page.

1. Start With the Full Catalog


Start Amazon Listing audit with full catalog

The first thing I do is look beyond the individual product page.

From the Amazon listing, click the brand name, open the Brand Store or seller catalog, and review the full product lineup.

I then use a tool such as JungleScout to estimate the monthly sales of each ASIN. I am looking for the brand’s 80/20 product, the product generating most of the revenue or showing the clearest opportunity.

That is usually where I start.

Improving a hero product that already has demand often creates more value than polishing a low-volume ASIN with limited upside.

I also establish:

  • Is the product launching, relaunching, or established?

  • Is the goal ranking, growth, profitability, or efficiency?

  • How much inventory is available?

  • How aggressively does the brand want to grow?

A launch-stage product should not be audited the same way as a mature bestseller. Riley’s audit process begins by opening the seller’s catalog, reviewing estimated sales across the lineup, and prioritizing the highest-revenue product first.

2. Record the Main KPIs


Record Main KPIs for Amazon Listing audit

Before changing the listing, I write down the account’s starting numbers.

At minimum, I want:

  • Total Amazon sales

  • Amazon ad spend

  • Advertising-attributed sales

  • ACoS

  • TACoS

  • Orders

  • Sessions

  • Conversion rate

  • Inventory position

  • Gross margin, when available

You can find most advertising metrics inside the Amazon Ads Console. Overall sales, sessions, ordered units, and conversion data can be found in Seller Central’s business reports.

To calculate TACoS manually:

Amazon ad spend ÷ total Amazon sales × 100

For example, if the account spends $1,000 on ads and generates $3,000 in total Amazon sales, TACoS is approximately 33.3%.

I treat these numbers as context, not the final diagnosis.

High ACoS may come from weak conversion, but it could also come from expensive keywords, poor targeting, an aggressive launch strategy, or limited organic sales.

The main question is:

Is this primarily a traffic problem, a conversion problem, an offer problem, or a combination of all three?

3. Audit Organic Rankings and Keyword Opportunity


Audit Organic Rankings and Keyword Opportunity for Amazon Listing audit

Next, I check where the product ranks organically:

  1. Open the product listing.

  2. Launch the Jungle Scout Chrome extension.

  3. Open the listing’s search-keyword data.

  4. Review the organic-rank column.

  5. Compare each ranking with its estimated search volume.

I do not only ask whether the product ranks. I ask what it ranks for.

A listing may hold several top-10 positions for tiny niche searches while remaining far outside page one for the larger, relevant terms that could materially increase traffic.

I record:

  • Current top-ranking keywords

  • Their relevance

  • Their estimated demand

  • Larger terms where the ASIN ranks poorly

  • Keywords that competitors rank for but the product does not

  • Realistic opportunities rather than unrelated high-volume terms

In one of my audits, a product ranked well for narrow “bib with tether” terms, but the larger opportunity was around broader baby-bib and teething-bib searches. The listing was ranking, it simply was not ranking where most of the traffic existed. 

Compare the Winners

I then search Amazon for the primary keyword and inspect the leading products.

For each strong competitor:

  1. Open its listing.

  2. Pull its organic keyword data.

  3. Sort or review the terms with the greatest estimated demand.

  4. Note where the competitor ranks highly.

  5. Compare its pricing, reviews, images, positioning, video, and A+ Content with yours.

The goal is not to copy the competitor. It is to understand where their visibility comes from and why shoppers may choose them.

4. Measure Conversion Before Increasing Traffic


Measure Conversion Before Increasing Traffic for Amazon Listing Audit

Low sales do not automatically mean you need more PPC.

Before increasing bids or budgets, I check whether the listing converts the traffic it already receives.

Find the Overall Conversion Rate

Inside Seller Central, go to:

Reports → Business Reports → Detail Page Sales and Traffic by Parent Item

Then:

  1. Select a useful date range, ideally around 90 days.

  2. Click Show/Hide Columns.

  3. Make sure Unit Session Percentage is selected.

  4. Find the parent ASIN you are auditing.

That percentage is the listing’s overall conversion rate. It shows how many product-page sessions turned into orders.

Amazon may rename or move reports, so look for the report containing sessions, ordered units, and unit session percentage by parent ASIN. Riley demonstrates this process directly in his audit walkthrough. 

Check Keyword-Level PPC Conversion

Overall conversion can hide major differences between audiences.

Inside the Amazon Ads Console, review the campaign’s search-term data or pull a Search Term Report. Look at:

  • Customer search term

  • Clicks

  • Orders

  • Sales

  • Spend

  • Conversion rate

  • ACoS

This shows whether the product converts for specific keywords rather than only as one blended average.

The diagnosis is simple:

  • Weak overall conversion: Improve the listing, offer, reviews, pricing, or targeting first.

  • Healthy conversion but low sessions: More qualified traffic may be the opportunity.

  • Some keywords convert while others fail: Relevance or targeting is likely the issue.

  • Branded searches convert but non-branded searches do not: The listing probably needs clearer differentiation for new shoppers.

Do not judge a keyword from two or three clicks, and do not use one universal conversion benchmark. Category, price, reviews, traffic source, seasonality, and brand recognition all matter.

I cover the wider strategy behind this in my Amazon Conversion Rate Optimization Guide, including how your main image, gallery, messaging, reviews, offer, and A+ Content work together after the shopper clicks.

5. Audit the Price, Offer, Reviews, and Rating


Audit the Price, Offer, Reviews, and Rating for Amazon Listing Audit

If shoppers reach the page but do not buy, I audit the offer.

Compare the Real Price

Search the main keyword and compare the product with the listings surrounding it.

Do not look only at the sticker price. Record:

  • Price

  • Quantity

  • Cost per unit or serving

  • Included accessories

  • Coupon or discount

  • Subscribe & Save

  • Delivery speed

  • Warranty or guarantee

A premium product can convert well when the listing makes the extra value obvious.

The issue is when a product costs more but looks nearly identical to a cheaper competitor.

I may recommend testing a lower launch price, but only after considering margins, cash flow, inventory, and ranking goals. You do not want to lower the price so aggressively that the brand stocks out.

Read the Reviews Like Customer Research

I review both the audited product and its leading competitors.

I look for:

  • Repeated complaints

  • Frequently praised benefits

  • Confusing features

  • Product-quality concerns

  • Reasons customers switched brands

  • Common questions the listing does not answer

Those themes should inform the bullets, gallery, comparison graphics, video, and A+ Content.

Use compliant review-generation methods only.

6. Audit the Value Proposition


Audit the value proposition for Amazon Listing Optimization

A shopper should understand four things very quickly:

  • What the product is

  • Who it is for

  • What makes it different

  • Why they should choose it over the alternatives

A lot of listings explain the category but never explain the advantage.

For example, a mushroom coffee brand may spend the entire page explaining why mushroom coffee is useful. But the shopper already searched for mushroom coffee.

The real question is:

Why should I buy this one instead of the other products on the page?

I look for that answer across:

  • Main image

  • Title

  • Bullet points

  • Gallery images

  • A+ Content

  • Comparison modules

  • Video

  • Brand Story

The message should stay consistent.

When every section emphasizes something different, the product becomes harder to understand.

My audit approach consistently prioritizes clear, simple, USP-focused messaging.

A useful test is:

Could a shopper explain why this product is different after looking at the listing for ten seconds?

When the answer is no, the problem is usually not a lack of information. It is a lack of hierarchy.

7. Audit the Main Image and Gallery

The main image determines whether the shopper clicks.

The gallery helps determine whether they buy.

Main Image Checklist


Audit Main image for Amazon Listing Optimization

I check whether the main image:

  • Makes the product immediately recognizable

  • Works at thumbnail size

  • Uses the available frame effectively

  • Looks competitive beside the top listings

  • Makes important packaging details readable

  • Avoids unnecessary clutter

  • Accurately represents the product

  • Follows current Amazon requirements

Always review it in search results and on mobile, not only at full desktop size.

The main image deserves its own testing process because it affects whether shoppers ever reach the listing. I break that down in my Amazon Main Image Optimization Guide.

Gallery Checklist


Audit Gallery for Amazon Listing Optimization

Each gallery image should have one clear job.

I look for coverage of:

  • Main benefit

  • Key differentiators

  • Important features

  • Size or quantity

  • How the product works

  • Use cases

  • Ingredients or materials

  • Trust signals

  • Comparison information

  • Common objections

  • What is included

When one image contains a headline, five paragraphs, several icons, and multiple claims, shoppers usually process none of it.

Clarity beats information overload.

8. Audit Photography, Video, and A+ Content


Audit Video and A+ Content for Amazon Listing Optimization

I think about strong listings through five broad pillars:

  • USP-focused

  • Simple

  • Strong photography

  • Strong video

  • Consistent branding

That is the same framework Riley uses when scoring a listing and giving the brand clear next actions. 

Photography

Review whether the listing has:

  • Clear product shots

  • Lifestyle photography

  • In-use imagery

  • Close-up details

  • Scale references

  • Packaging views

If the listing relies entirely on product renders or basic infographics, professional lifestyle photography may be one of the largest opportunities.

Video

Riley’s audit process looks for three useful video types:

  • Featured video: A concise commercial-style overview that sells the product quickly.

  • Long-form video: A deeper explanation, demonstration, founder walkthrough, recipe, setup guide, or mini-infomercial.

  • Customer-facing video: Authentic content showing how the product fits into real life, provided and used in compliance with Amazon’s current policies.

A polished commercial is useful, but the brand can also record a simple founder video explaining why the product was created, how it works, and why it is different.

A+ Content


Amazon Premium A+ Design Vybrance Labs

Scroll through the entire A+ section and ask:

  • Does it reinforce the main USP?

  • Does it explain why the product is different?

  • Is the text readable on mobile?

  • Does it answer common questions?

  • Does it handle objections?

  • Does it show the product in use?

  • Does the comparison content help shoppers decide?

  • Does it match the brand’s gallery and packaging?

Do not add A+ Content merely to fill the page. Every module should move the shopper closer to a decision.

This audit is only meant to identify whether A+ Content is a major weakness. For the full module strategy, layout considerations, and content approach, read my Amazon Premium A+ Content Guide.

9. Decide Whether Traffic Is Actually the Problem

Only after reviewing conversion, offer, messaging, and creative do I decide whether the account needs more traffic.

I check:

  • Is the listing converting qualified visitors?

  • Does it rank for meaningful keywords?

  • Are PPC campaigns targeting the right searches?

  • Are converting campaigns running out of budget?

  • Is there enough inventory to support growth?

  • Is the listing ready for more traffic?

My preferred order is:

  1. Optimize the listing.

  2. Confirm that it converts.

  3. Improve organic ranking and PPC traffic.

  4. Consider external traffic only when the listing and offer are ready.

Driving more traffic to a weak listing usually makes the problem more expensive.

At the same time, repeatedly redesigning a listing that already converts well may be less valuable than improving visibility.

10. Turn the Audit Into an 80/20 Action Plan


Turn the Amazon Listing Audit Into an 80/20 Action Plan

I do not finish an audit with a list of 40 unrelated problems.

I identify the few actions most likely to matter and organize them into a 90-day game plan.

For each recommendation, record:

  • The issue

  • Why it matters

  • Expected impact

  • Difficulty

  • Owner

  • Deadline

  • Metric to monitor

Then prioritize the work.

First 30 Days

Fix immediate blockers such as:

  • Unclear positioning

  • Weak main image

  • Missing gallery information

  • Uncompetitive offer

  • Poorly targeted PPC

  • Important unanswered objections

Days 31–60

Complete larger improvements such as:

  • New photography

  • Gallery redesign

  • Video production

  • A+ Content

  • Copy updates

  • Keyword and campaign restructuring

Days 61–90

Measure the changes, review conversion and rankings again, and increase qualified traffic where the data supports it.

That is the 80/20 approach: fix the biggest constraint first, measure what happened, and then move to the next highest-impact opportunity.

When the audit shows that the entire page needs work rather than one isolated fix, our Amazon Listing Optimization service covers the strategy, messaging, copy, main image, gallery, and A+ recommendations as one connected project.

Quick Amazon Listing Audit Checklist

Before making major changes, review:

Business: Priority ASIN, lifecycle stage, goals, sales, ad spend, ACoS, TACoS, inventory, and margins.

Traffic: Organic rankings, keyword demand, competitor visibility, PPC coverage, and traffic quality.

Conversion: Sessions, ordered units, unit session percentage, and keyword-level PPC performance.

Offer: Price, quantity, reviews, rating, coupons, delivery, and value versus competitors.

Listing: Main image, gallery order, USP, title, bullets, photography, video, A+ Content, mobile readability, and brand consistency.

Action plan: The top three fixes, who owns them, and what should happen over the next 90 days.

What Should You Fix First?

The answer will be different for every product.

Some listings need stronger images. Others need clearer positioning, a better offer, more relevant traffic, or improved keyword targeting.

The mistake is assuming the listing needs more traffic before proving it can convert the traffic it already receives.

A proper Amazon listing audit gives you a diagnosis instead of a collection of guesses.

Start with the business data. Review rankings and conversion. Evaluate the offer, messaging, creative, and trust. Then decide whether traffic is actually the constraint.

Once you know the real problem, the process becomes much simpler:

Fix the biggest issue first, measure the result, and move to the next highest-impact opportunity.

Need a Professional Amazon Listing Audit?

At Amazing Creative, we help Amazon brands identify the positioning gaps, creative weaknesses, and conversion issues holding their listings back.

We review the listing, images, messaging, A+ Content, offer, and wider conversion strategy before recommending what to fix first.

Explore our Amazon Listing Optimization service for a deeper breakdown of how we improve underperforming listings.