How to A/B Test Amazon Main Images with Manage Your Experiments
Stop guessing which image will win the click.

Your Amazon main image is one of the biggest factors determining whether a shopper clicks your listing or keeps scrolling.
Before they see your gallery images, bullet points, videos, or A+ Content, shoppers compare your main image against every other product in the search results.
That makes the main image one of the first things I test when a product is getting impressions but not enough traffic.
The problem is that most sellers choose their main image based on opinion.
The brand owner likes one version. The designer prefers another. Someone on the team thinks the product should be bigger. Another person wants to show the packaging.
None of those opinions tell you which image shoppers will actually respond to.
That is why I use Amazon’s Manage Your Experiments tool to A/B test different main-image concepts with real shoppers.
In this guide, I’ll show you how to set up a main-image experiment, what concepts are worth testing, how to interpret the results, and how I use my AB4 method to move beyond a single test.
Quick Answer: How Do You A/B Test an Amazon Main Image?
To A/B test an Amazon main image:
Sign in to Seller Central.
Go to Brands and open Manage Experiments.
Select Create a New Experiment.
Choose an image experiment.
Select an eligible ASIN.
Use your current main image as Version A.
Upload the alternate main image as Version B.
Review the experiment settings.
Schedule the experiment.
Let the experiment finish before choosing a winner.
Amazon divides eligible shoppers into groups and shows each group a different version. Once enough data is collected, you can compare performance using metrics such as sales, conversion rate, units sold, units sold per unique visitor, sample size, and the probability that one version performs better.
Do not stop after one experiment.
Create several meaningfully different concepts, keep the winner from each test, and continue testing until you have found the strongest option.
What Is Amazon Manage Your Experiments?

Manage Your Experiments is Amazon’s built-in A/B-testing platform for product-detail-page content.
It can test different versions of:
Product images
Titles
Bullet points
Product descriptions
A+ Content
Brand Story content
Amazon randomly divides shoppers between the two versions instead of changing the content for everyone at once. This creates a cleaner comparison between Version A and Version B.
For a main-image test:
Version A is normally your currently published image.
Version B is the new image you want to test.
The purpose is not simply to find the prettier image.
It is to determine which concept helps produce better business results.
Who Can Use Manage Your Experiments?
To access Manage Your Experiments, you need:
A Professional selling account
A brand enrolled in Amazon Brand Registry
Brand Representative permissions for that brand
An eligible product with enough recent traffic to produce useful results
Amazon determines product eligibility based partly on recent traffic. You can see which ASINs are eligible when you create a new experiment inside Seller Central.
If your ASIN does not appear, it may not currently have enough traffic to generate a reliable test.
That does not mean you should choose an image blindly. You can still use competitor research, customer surveys, and preference-testing tools to narrow down the concepts before the ASIN becomes eligible. Just remember that a preference poll is not the same as an experiment using actual Amazon shopping behavior.
Why Main-Image A/B Testing Matters

The main image mainly controls what happens before the click.
In Amazon search, shoppers can usually see several decision-making elements:
Main image
Title
Price
Reviews
Star rating
Coupon or discount
Delivery estimate
The main image is the largest visual element in that group.
A weak image can make a strong product look generic. A confusing image may attract the wrong shopper. A tiny product render can make the offer look less valuable than competing listings.
That is why I think of your main image as a search-page billboard.
Its job is to:
Explain the product quickly
Communicate the most important value
Stand out appropriately
Attract a qualified shopper
Earn the click
Before creating test concepts, it helps to understand what actually makes a main image stand out in search without becoming misleading or cluttered. I break that down in my Amazon Main Image Optimization Guide, including competitor research, mobile visibility, product sizing, and concept development.
Do Not Test Random Images

A good experiment starts before you open Seller Central.
Do not ask your designer to create four slightly different packshots and assume you have a serious testing strategy.
First, identify what might be holding back the current image.
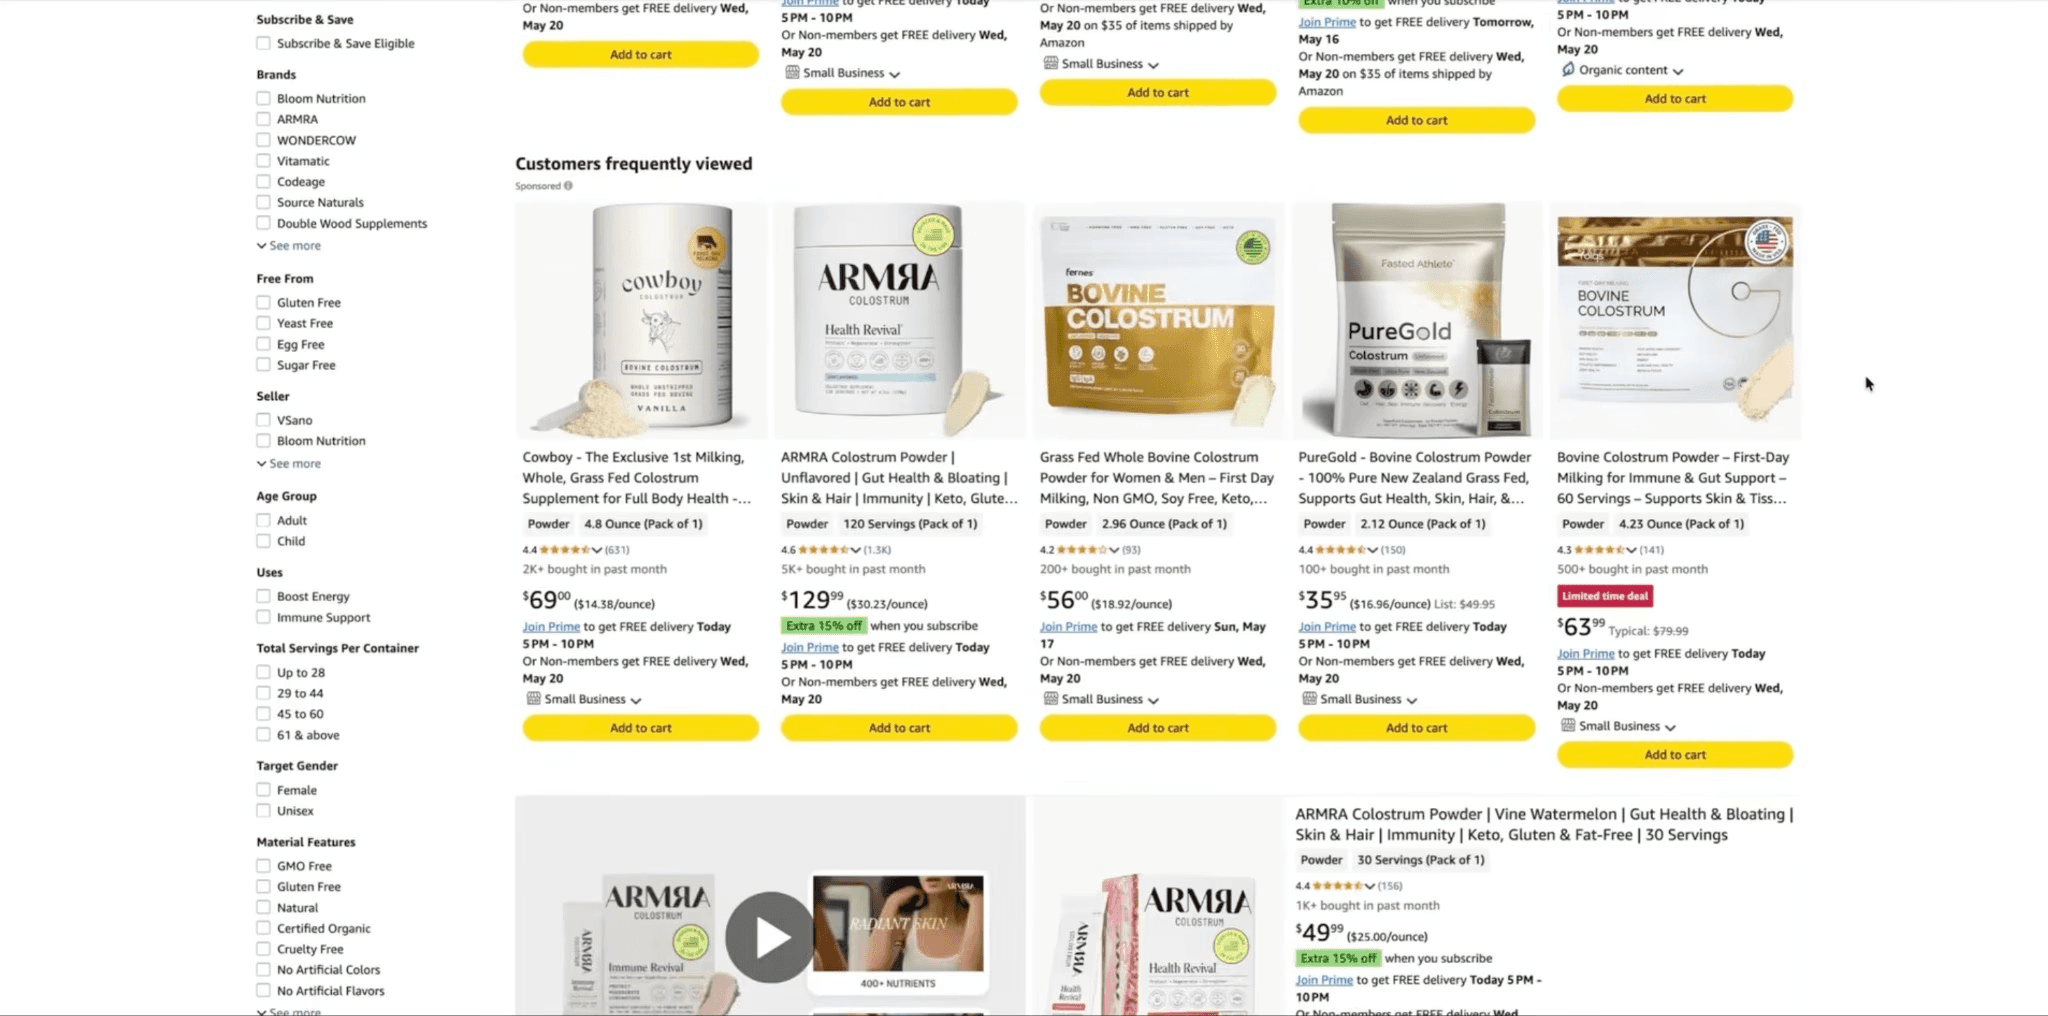
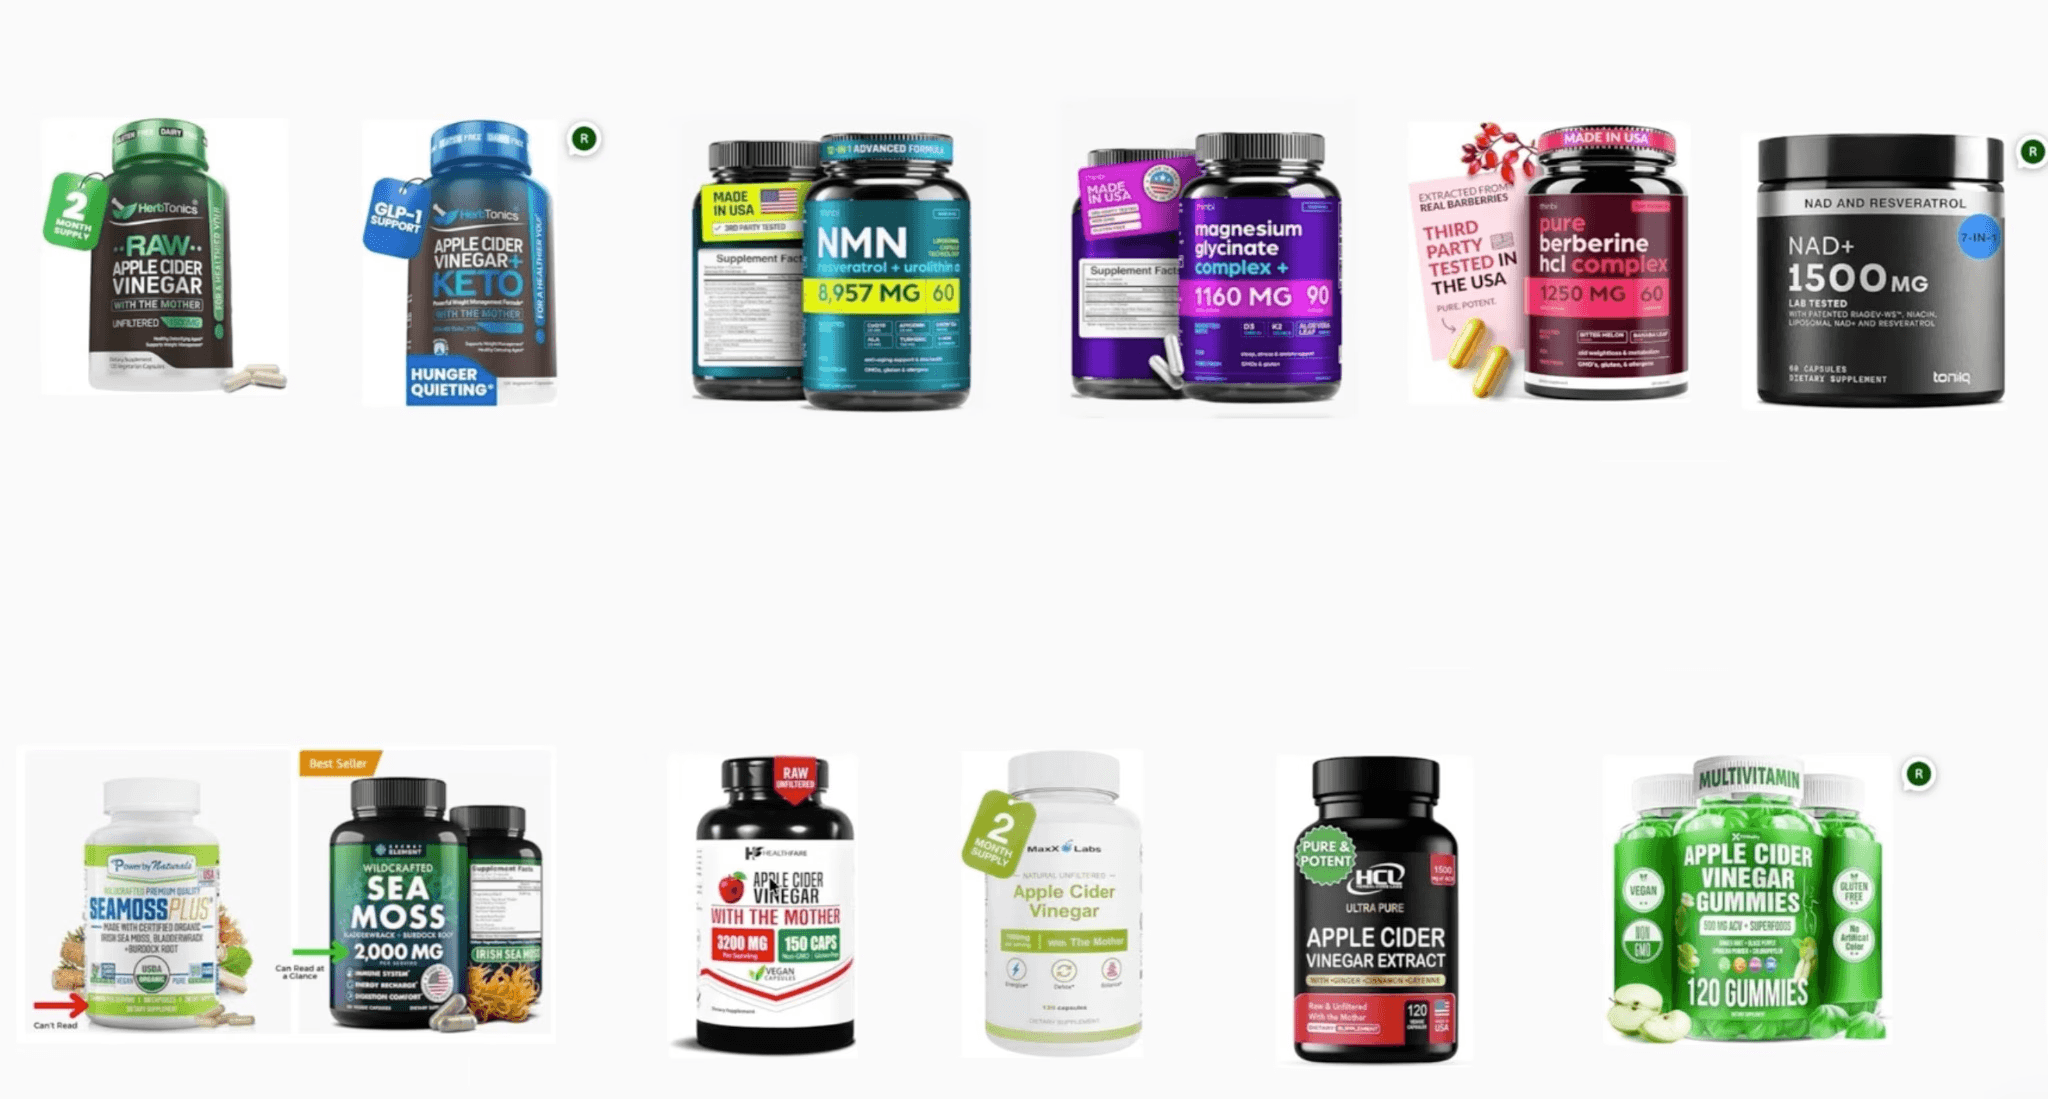
Search your main keyword and compare your product against the top listings.
Look at:
How much space each product occupies
Which images remain clear on mobile
Whether packaging is included
How quantity or size is communicated
Whether capsules, gummies, powder, accessories, or included items are shown
Which colors stand out
Which images look trustworthy
What every competitor is doing similarly
What important information competitors are missing
Then identify the product’s main selling point.
That might be:
More servings
A higher dose
A larger quantity
Better ingredients
A cleaner formula
A useful bundle
Better packaging
A specific use case
A meaningful certification
Better value
You need a hypothesis before you need a design.
For example:
I believe showing the product and its packaging together will increase sales because the packaging makes the quantity and primary benefit easier to understand in search.
That gives the experiment a purpose.
Main-Image Concepts Worth Testing

The right concepts depend on the product, category, target keyword, and nearby competition.
These are some of the most useful directions to explore.
A Larger Product
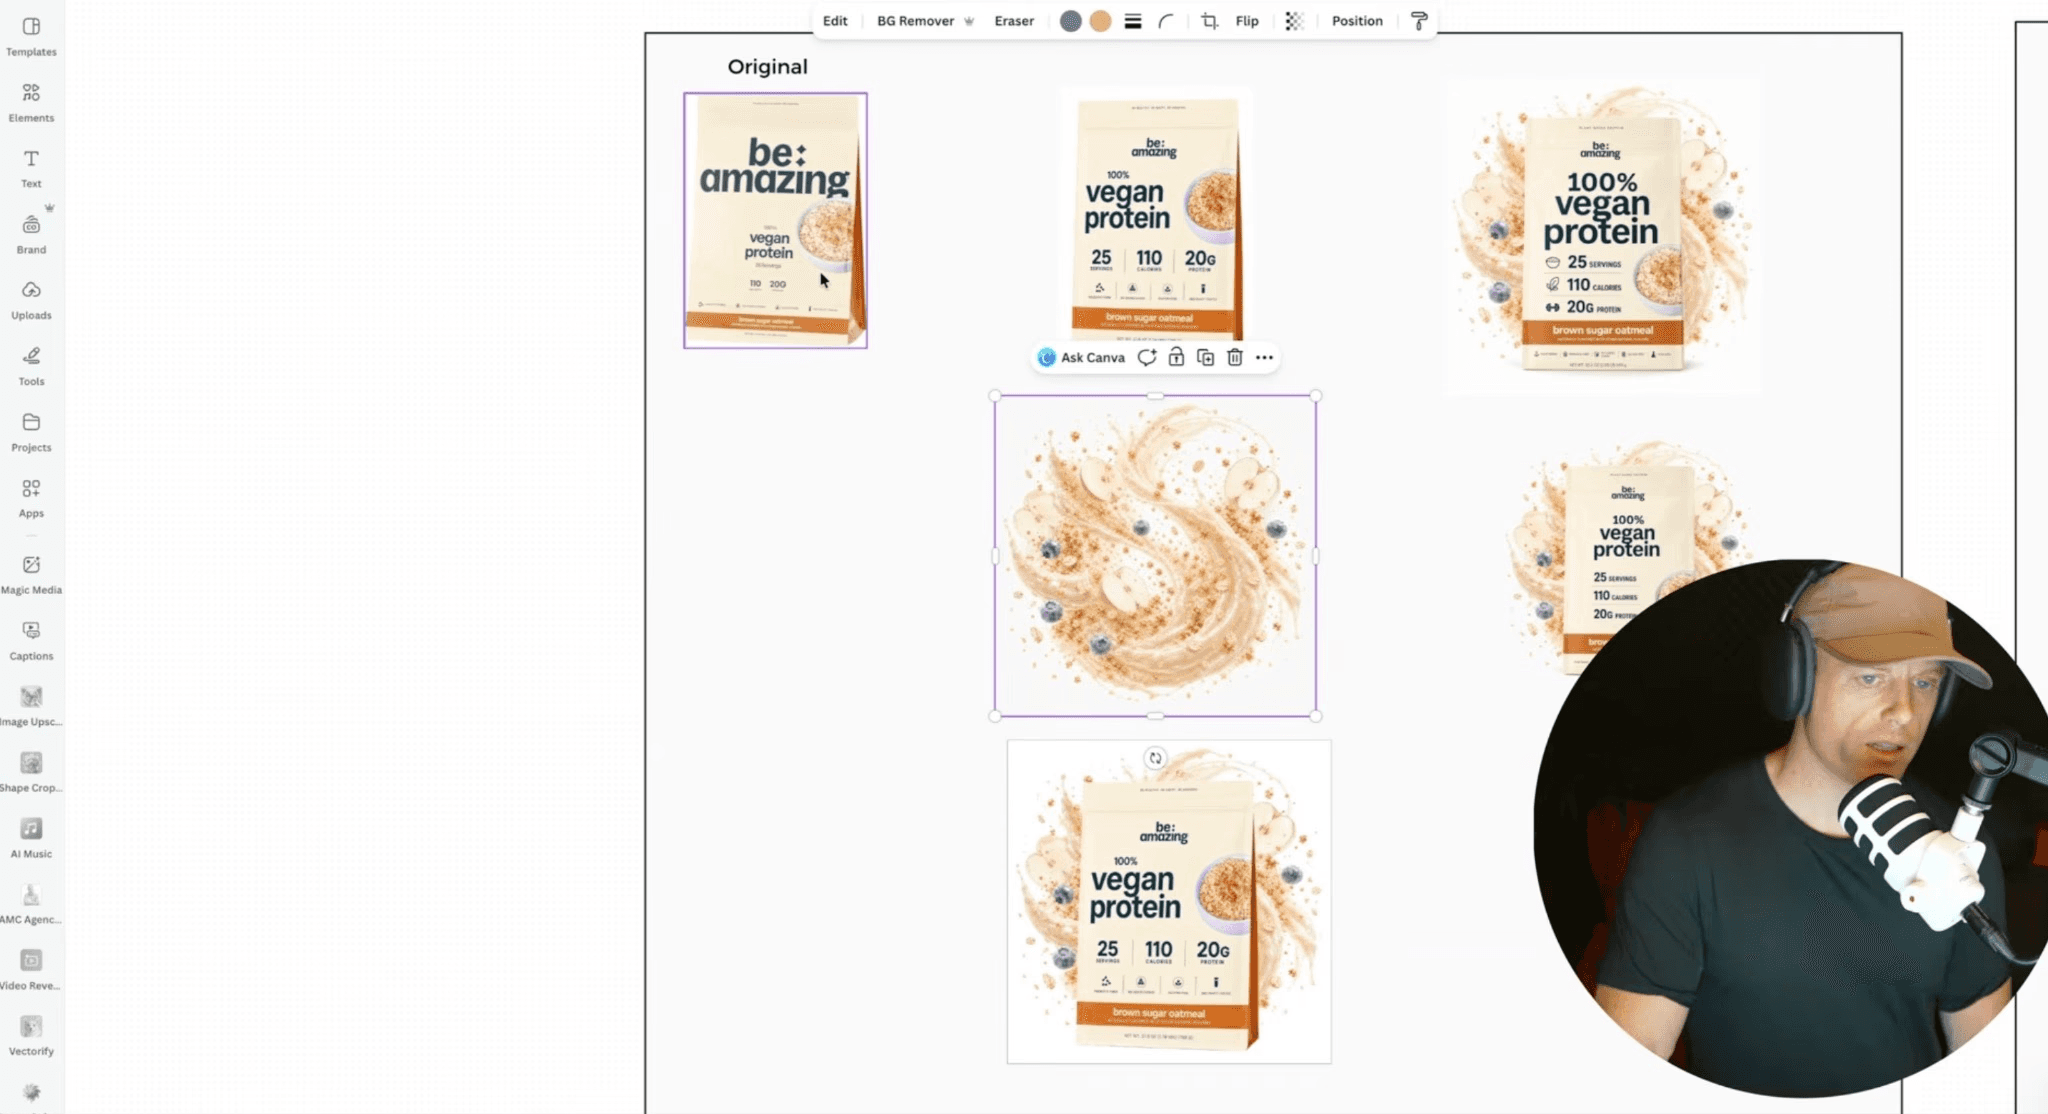
Test whether increasing the product’s visual size makes it easier to recognize in search.
This can be effective when the current product looks small or weak next to competitors.
Do not enlarge it so aggressively that the proportions become misleading. The image still needs to set accurate expectations.
Product Plus Packaging
Packaging can provide additional visual space for communicating:
Product type
Quantity
Flavor
Size
Primary benefit
Included items
Test this only when the packaging improves clarity. If it adds clutter without explaining anything, it does not belong.
Product Form
Depending on the category, test showing the actual:
Gummies
Capsules
Powder
Liquid
Product pieces
Accessories
Components
This can make the offer easier to understand without requiring shoppers to open the listing.
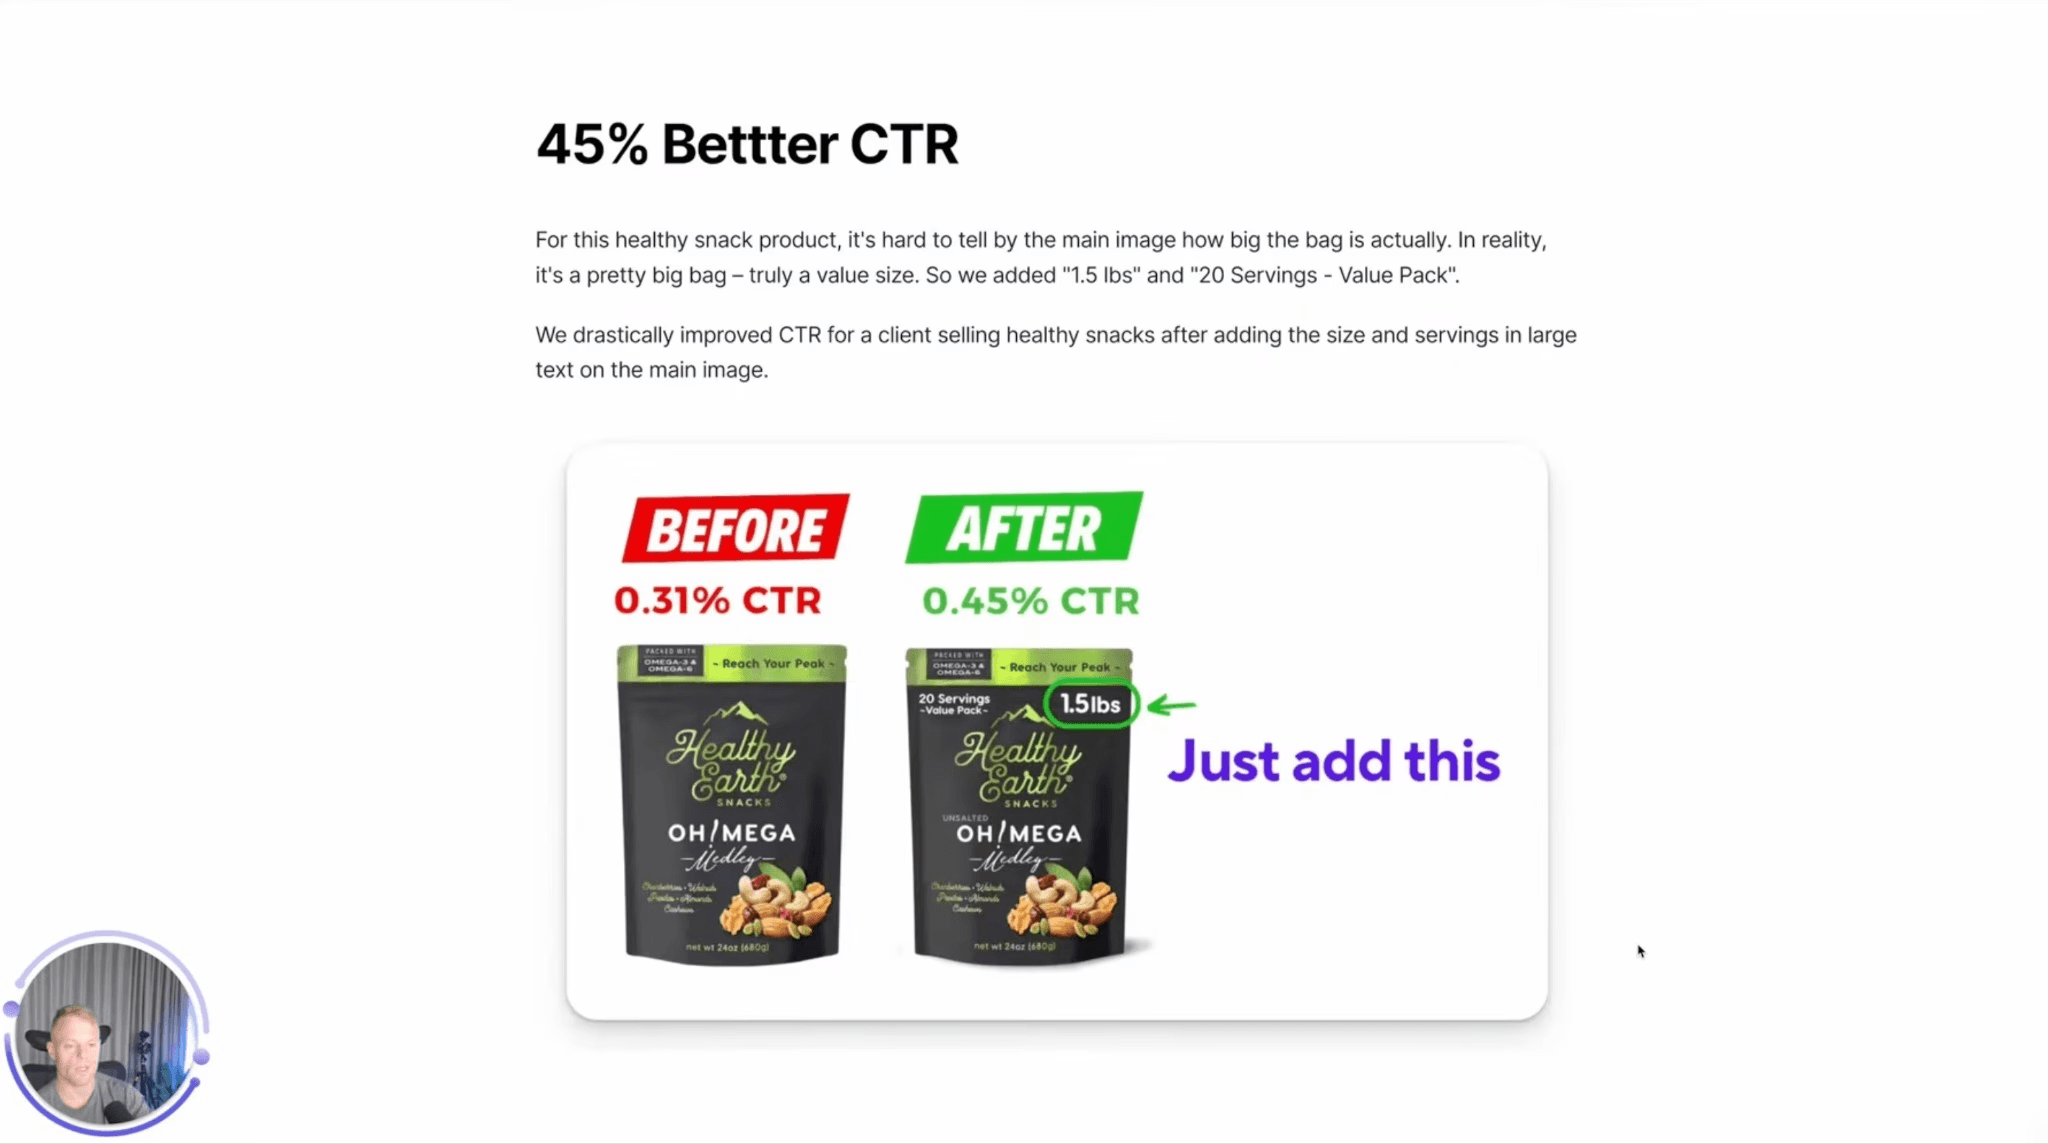
Quantity or Size Emphasis
If shoppers care about how much they receive, test making that information easier to notice.
Examples include:
120 capsules
75 servings
1.5 pounds
Three-pack
20-count
Value pack
The information must be accurate and consistent with what the customer will receive.
Bundle Contents
When the product includes several items, test a version that clearly displays the complete bundle.
A shopper should not have to guess whether accessories or additional pieces are included.
Different Color Direction
Color can affect how the image appears beside surrounding products.
In one of my own product experiments, changing the phone color shown with a magnetic wallet produced very different results. The orange version performed better than white, and a later blue version performed better again. That was a useful reminder that the concept I personally expect to win may not be the one shoppers choose.
The lesson is not that blue always performs best.
The lesson is that you do not know until you test.
Ingredient or Flavor Cue
For food, supplements, beauty, and CPG products, an accurate ingredient or flavor cue may help shoppers understand the product faster.
Keep it clean and category-compliant. Do not imply that something is included when it is not.
Make Version A and Version B Meaningfully Different

Amazon specifically recommends creating versions that are significantly different. When the changes are too small, it becomes harder to determine whether any difference in performance came from the content or random variation.
A weak test might compare:
Product moved five pixels
Slightly brighter background
Tiny shadow difference
Almost identical crop
A stronger test might compare:
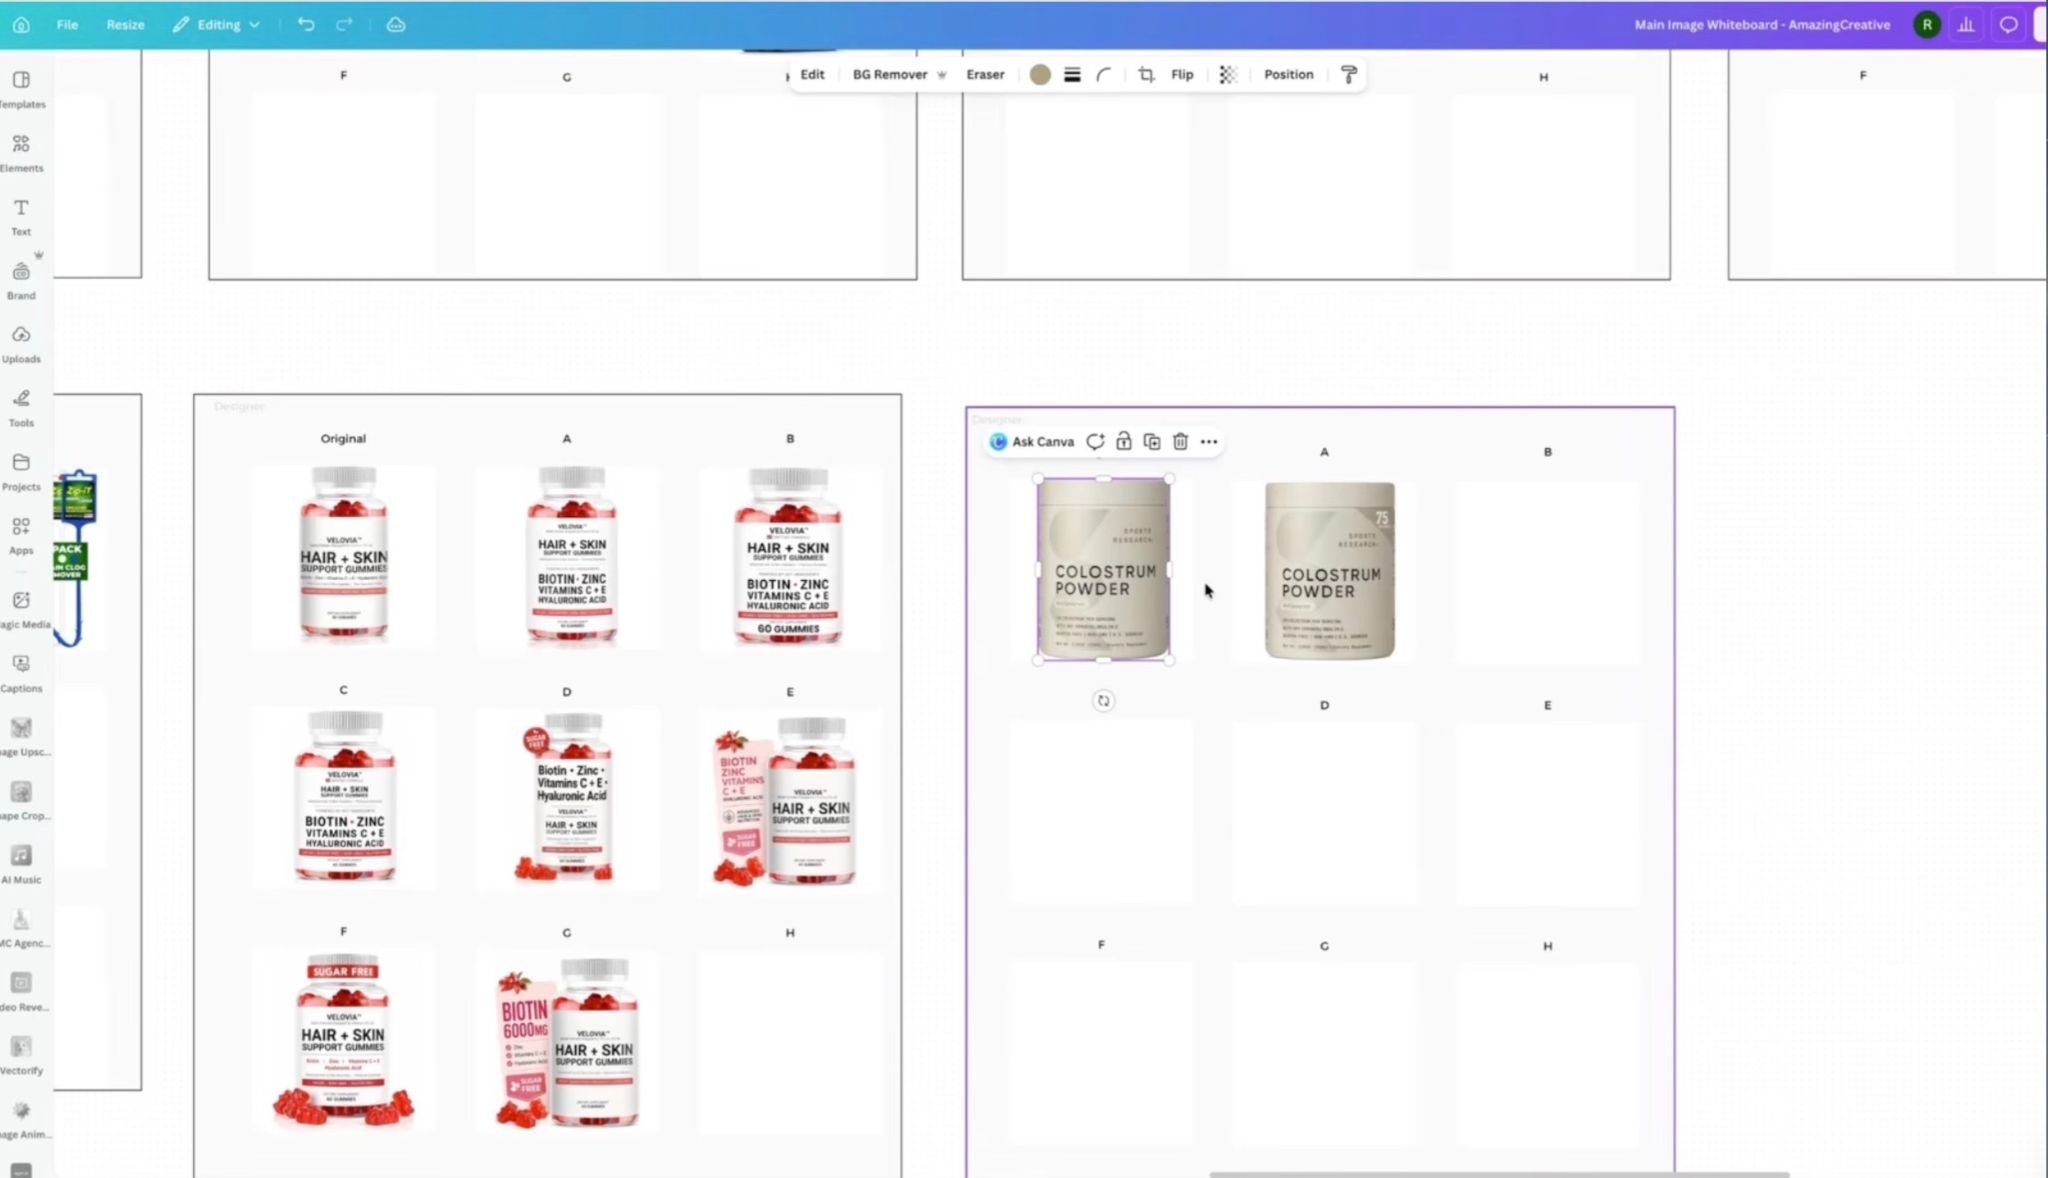
Product only versus product and packaging
Small render versus larger product
Bottle only versus bottle and capsules
Standard packshot versus quantity-focused concept
White phone versus blue phone
Single product versus full bundle
You should still change one main concept at a time.
If Version B changes the product size, background balance, packaging, color, quantity display, and product arrangement all at once, you may find a winner without learning why it won.
There is a balance:
Different enough to produce a meaningful result
Controlled enough to teach you something useful
How to Set Up a Main-Image Experiment

Amazon’s interface can change, but the current workflow follows this general process.
Step 1: Open Manage Experiments
Sign in to Seller Central.
Hover over Brands in the main navigation and select Manage Experiments. Amazon also provides a direct Manage Your Experiments dashboard for eligible accounts.
Step 2: Create a New Experiment

Select Create a New Experiment.
Choose the image experiment type and select the product you want to test.
Only eligible products will appear.
Step 3: Choose What You Are Testing

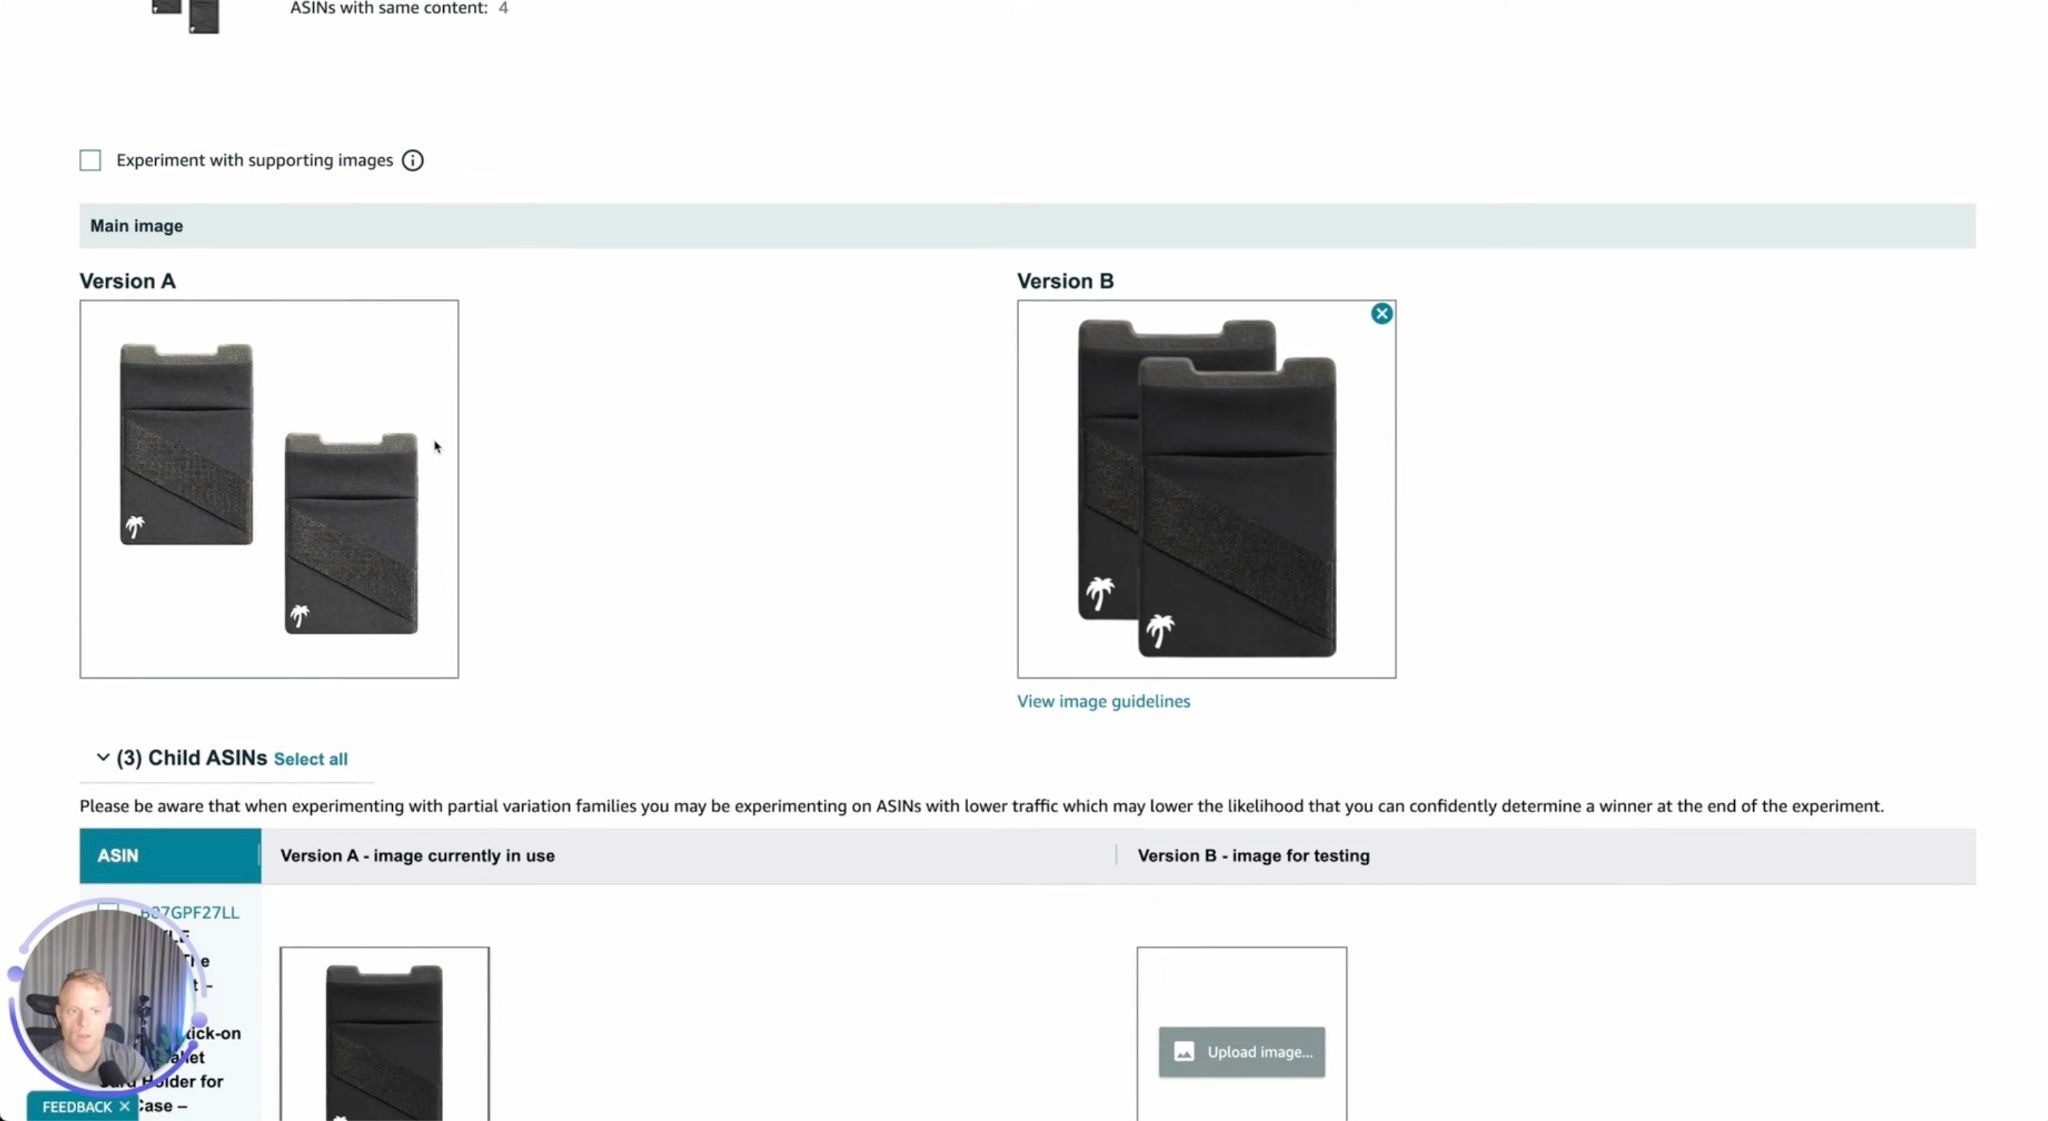
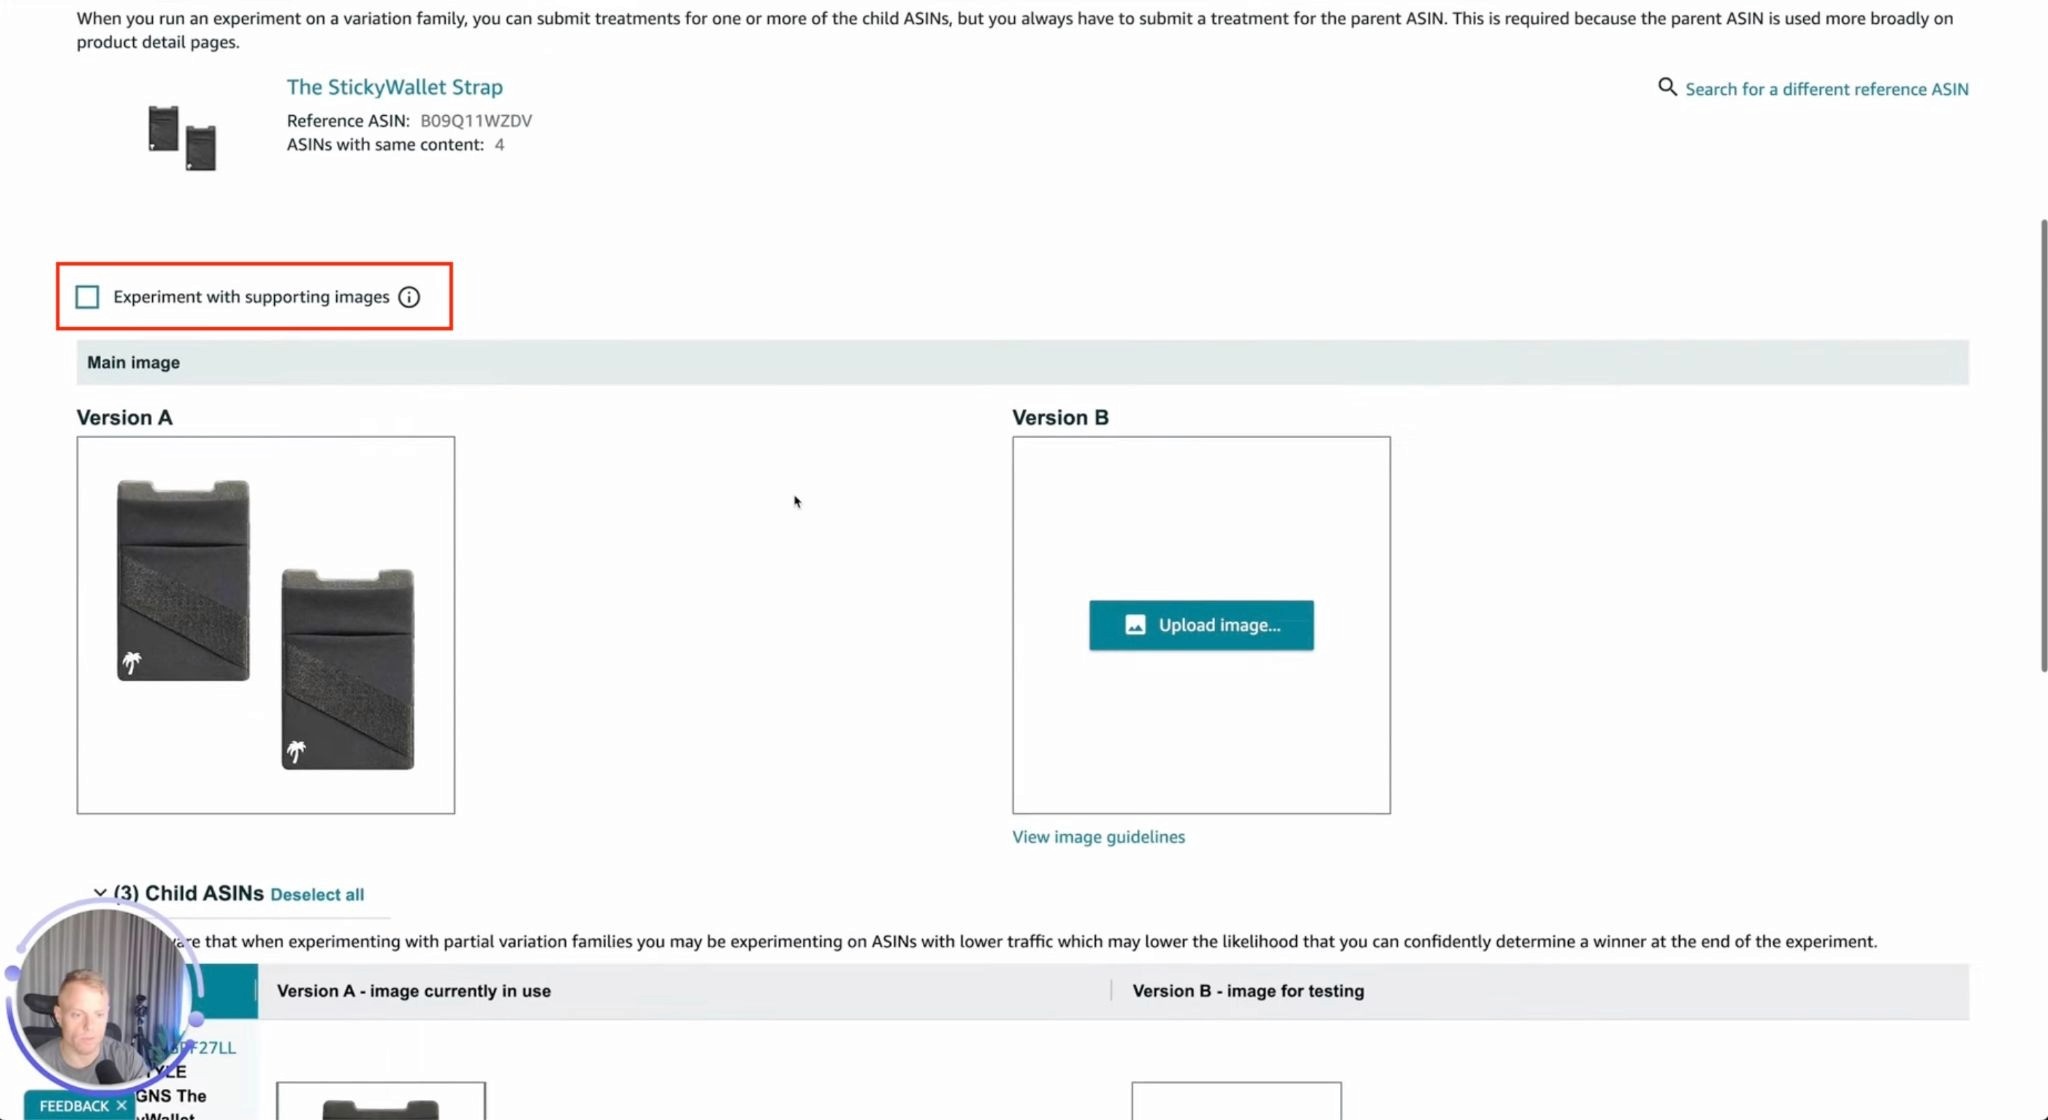
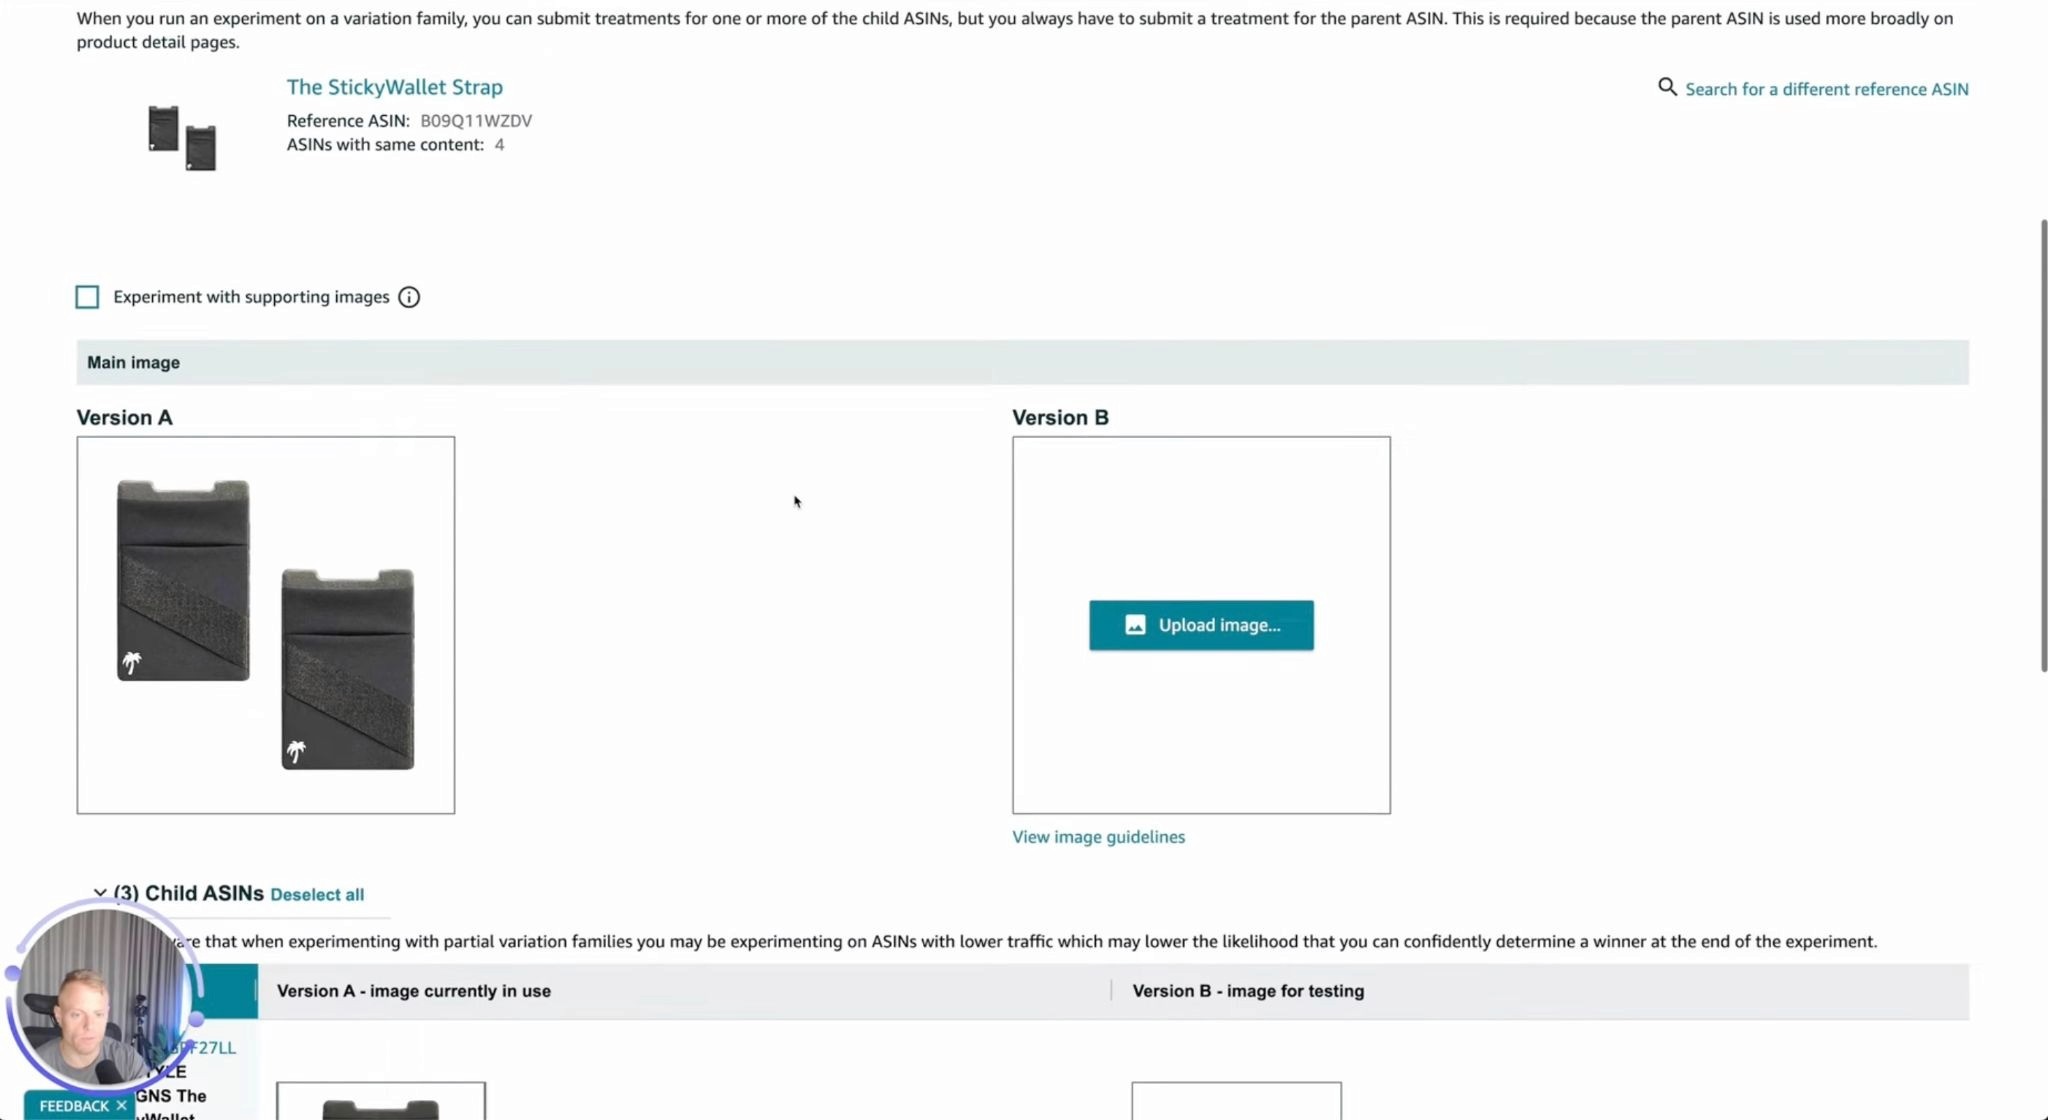
Confirm that you are testing the main product image rather than unintentionally changing the supporting gallery (uncheck the “Experiment with supporting images” option).

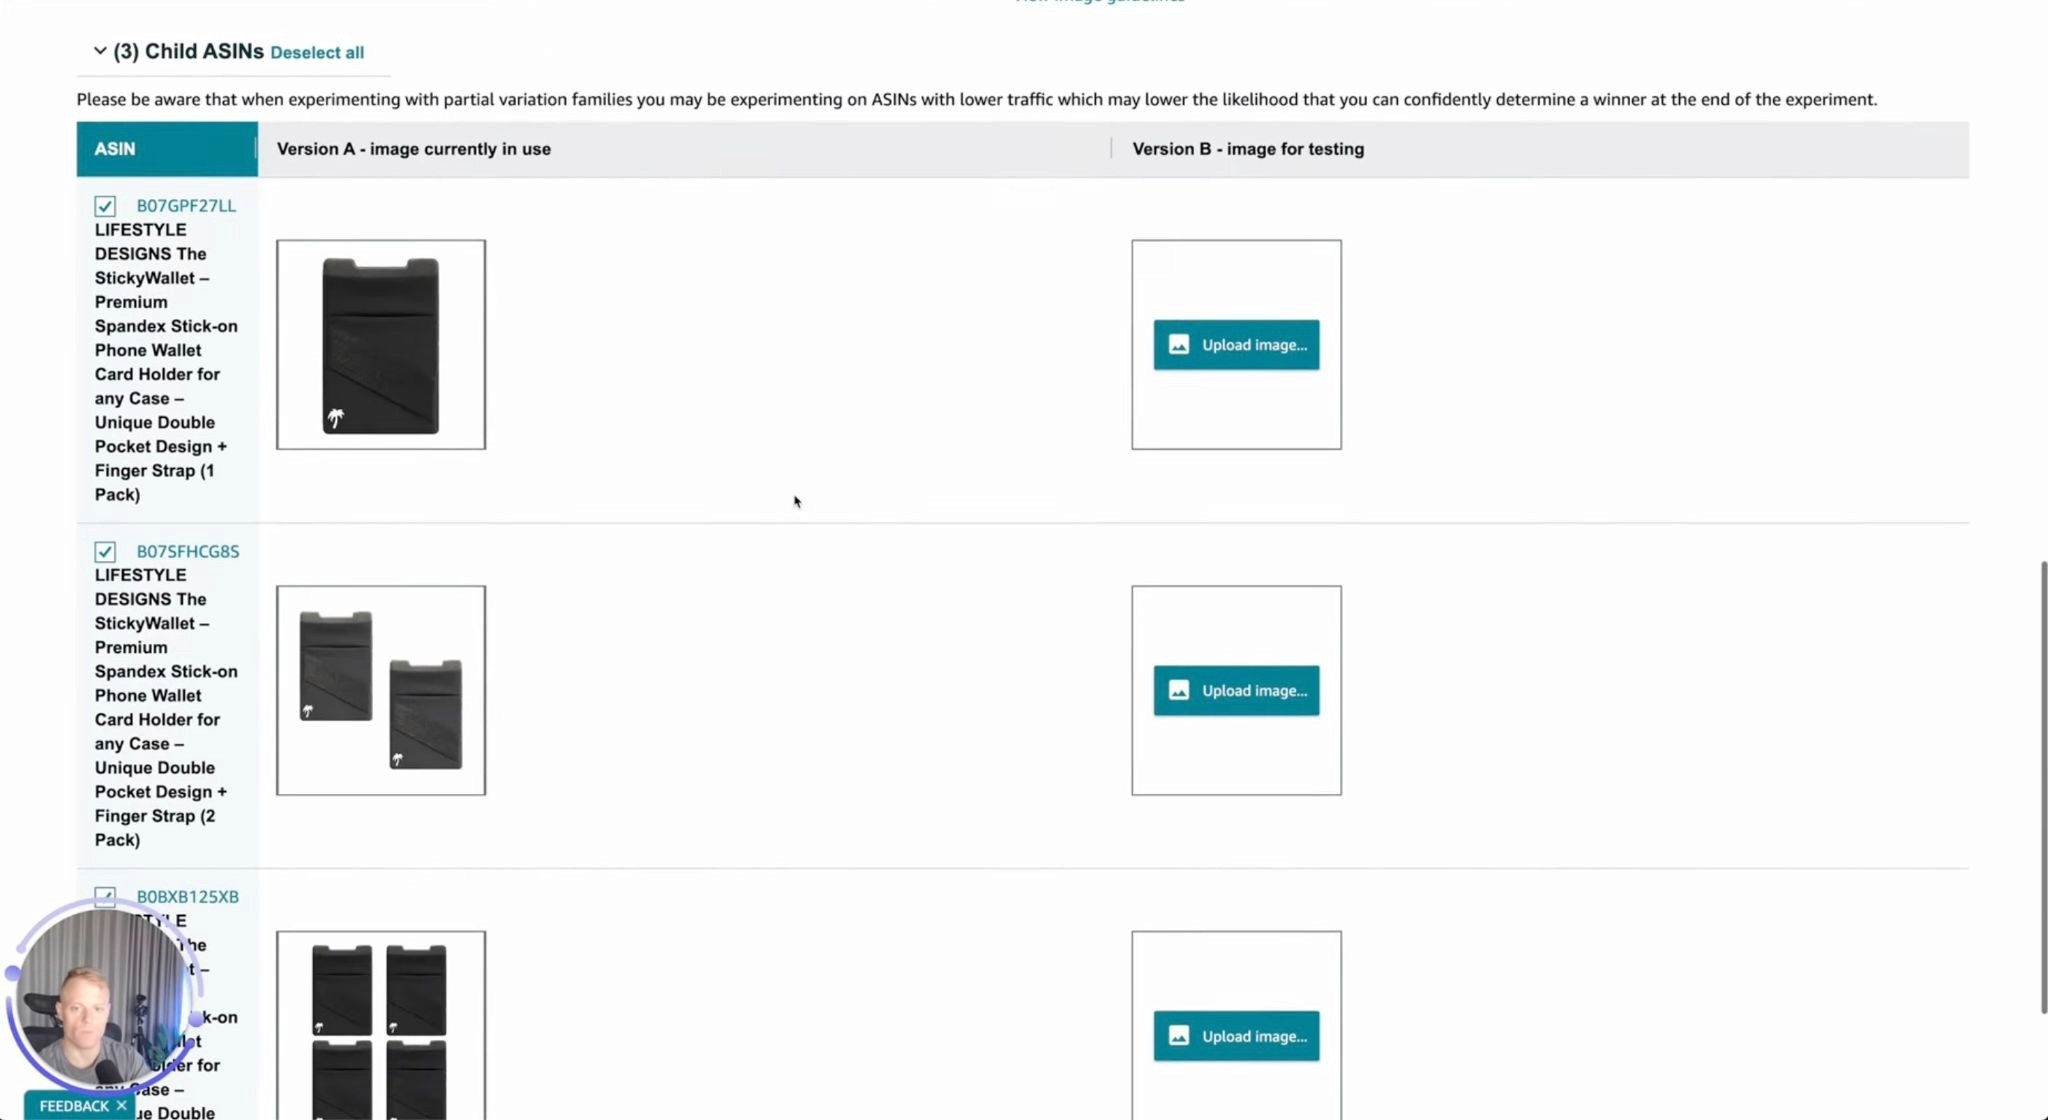
If the product has several child variations, make sure the correct variation or group is selected.
The exact controls may differ depending on the variation family and current Seller Central interface, so review the selected ASINs carefully before scheduling.
Step 4: Prepare Version A

Version A is normally the image currently published on the listing.
Confirm that this is the correct control image.
Do not change Version A in the middle of the experiment through another listing-management process.
Step 5: Upload Version B
Upload the alternate image and select it as Version B.
Both images should meet Amazon’s current product-image requirements and accurately represent the product.
Amazon’s current workflow lets you upload an image and select it through the file picker while creating the experiment.
Step 6: Add the Experiment Details
Give the experiment a clear name.
Instead of:
Main image test
Use something like:
Creatine Gummies - Bottle Only vs Bottle and Gummies - August 2026
Also record your hypothesis:
Showing the gummies will improve performance because shoppers can understand the product form immediately.
This makes your experiment history far more useful later.
Step 7: Review the Duration and Publishing Settings
Amazon now preselects settings intended to generate results efficiently. Experiments can begin after validation, run until enough information is collected to identify a winner, and automatically publish the winning version when enabled.
Amazon recommends allowing a manually scheduled experiment to run for around eight to ten weeks. With the “to significance” setting, some experiments may reach a result in as little as four weeks, depending on traffic and performance differences.
Do not end the test because one version appears ahead after a few days.
Early results can reverse.
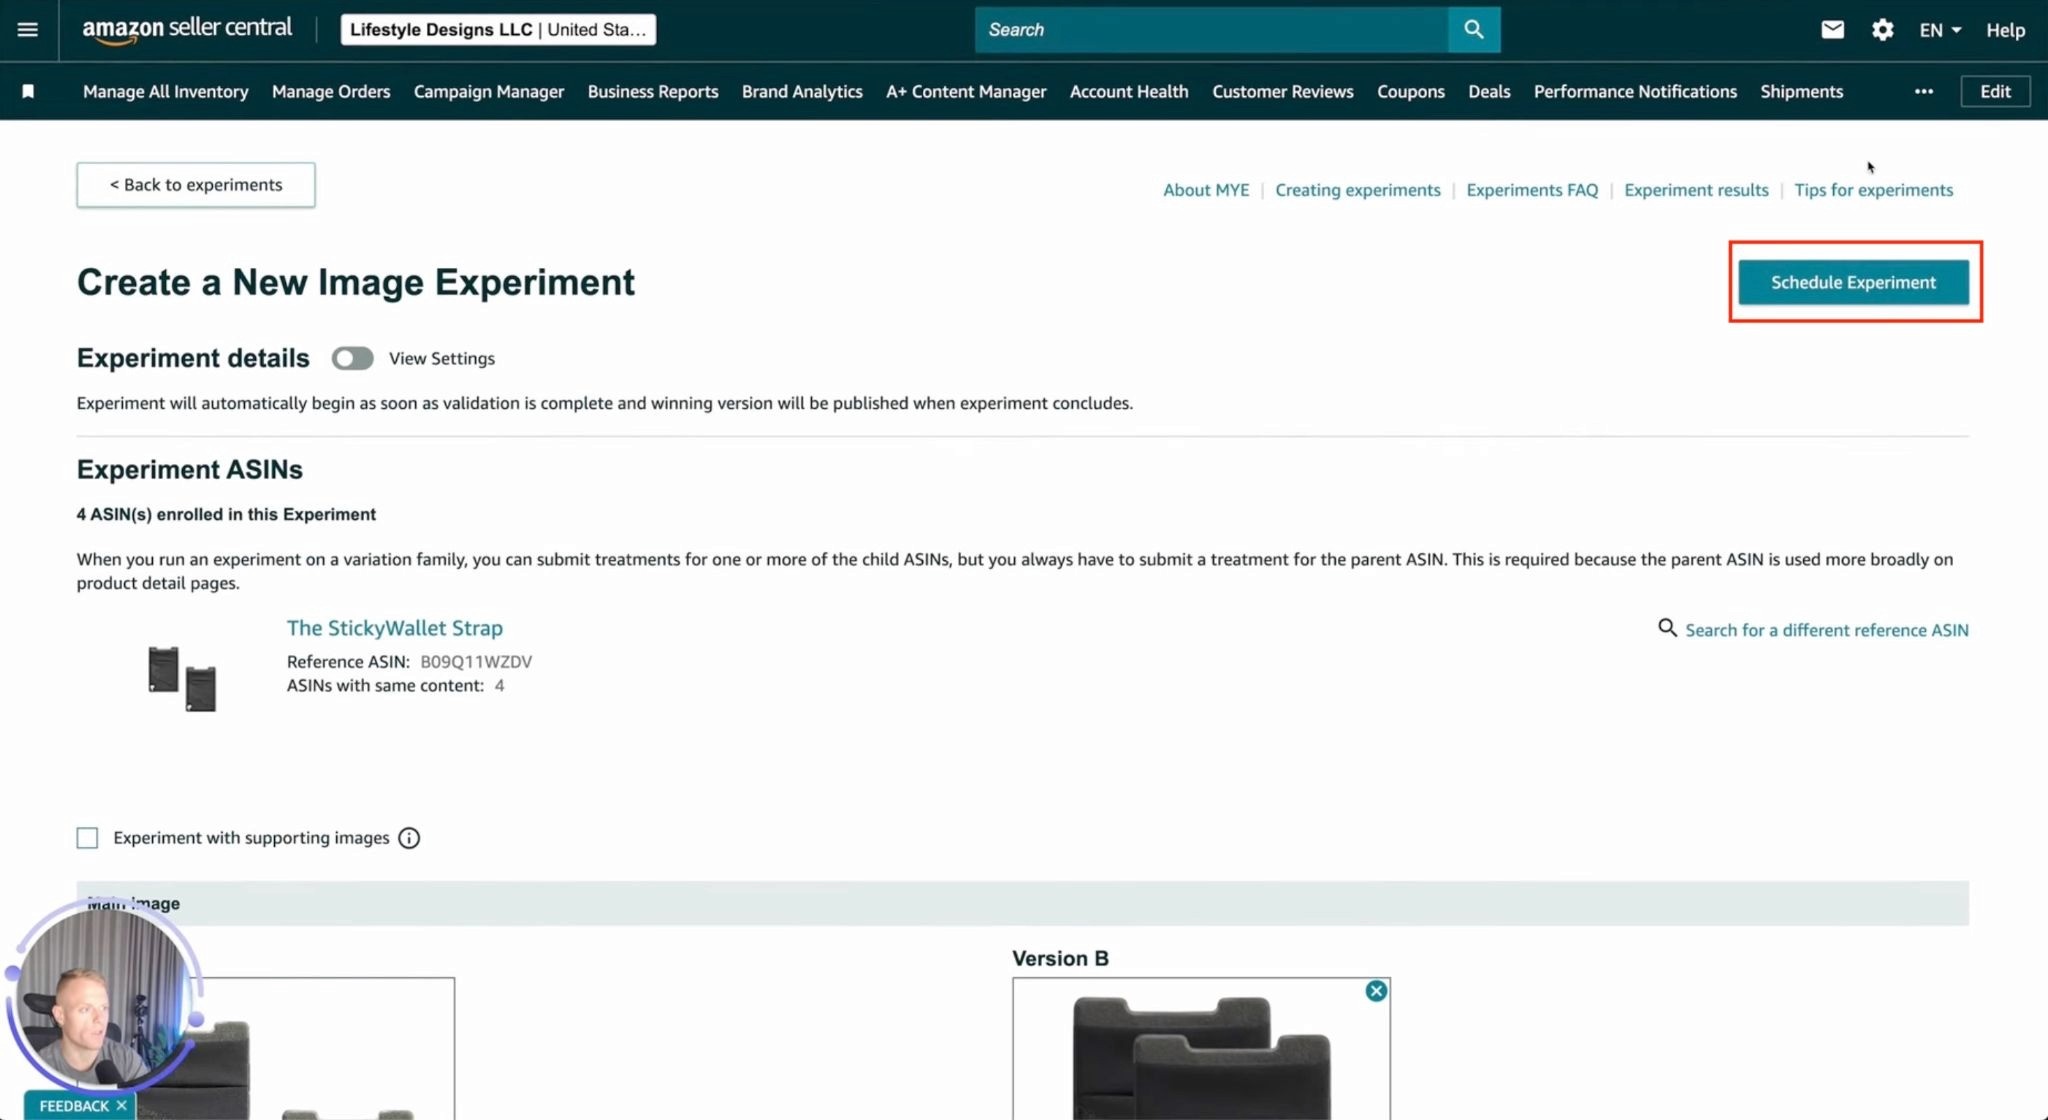
Step 8: Schedule the Experiment

Review everything one final time and select Schedule Experiment.
Amazon will validate the content before the test begins.
You can monitor the experiment from the Manage Your Experiments dashboard.
The AB4 Method

The biggest mistake is running one A/B test and assuming the job is finished.
You only learned which of two images performed better.
You did not prove that the winner is the strongest possible concept.
That is why I use what I call the AB4 method.
Create four strategic concepts:
Image A
Image B
Image C
Image D
Then run the experiments in sequence:
Round 1: A vs B
Test the current image against your first alternate concept.
Keep the winner.
Round 2: Winner vs C
Take the winning image from Round 1 and test it against the third concept.
Keep that winner.
Round 3: Winner vs D
Take the Round 2 winner and test it against the fourth concept.
The final winner has now defeated three alternatives.
This is not the same as proving that no other image could ever perform better, but it gives you far more confidence than choosing one concept based on a design meeting. Riley outlines this exact winner-versus-next-image sequence in his Amazon SEO training.
Once you find a winning concept, you can go deeper.
For example, if the product-plus-packaging concept wins, create new versions of that direction:
Different product arrangement
Larger packaging
Different angle
Different spacing
Different quantity emphasis
Then test those refinements against one another.
How to Analyze the Results

Amazon updates experiment results during the test and provides a full comparison once it finishes.
The current reporting can include:
Probability that one version is better
Units sold
Sales
Conversion rate
Units sold per unique visitor
Sample size
Projected one-year sales impact
Amazon does not always present the experiment as a simple CTR report. Manage Your Experiments is designed to evaluate the broader shopping outcome, including conversion and sales.
That matters because the highest-clicked image is not automatically the best image.
Imagine that Version B attracts more curiosity but creates the wrong expectation. More shoppers click, but fewer of them buy.
That is not necessarily an improvement.
The best main image should:
Earn more attention from the right shopper.
Set an accurate expectation.
Help produce stronger downstream sales performance.
Look at the complete result, not one isolated number.
What If There Is No Clear Winner?
An inconclusive result is still useful.
It may mean:
The images were too similar
The ASIN did not receive enough traffic
The difference did not meaningfully affect shopper behavior
Both concepts performed similarly
The experiment needs more time
Another listing factor is having a stronger influence
Do not force a conclusion that the data does not support.
Keep the existing image if there is no convincing reason to replace it, then develop a more distinct challenger.
Main-Image Testing Is Only One Part of CRO

The main image gets shoppers into the listing.
The listing still has to convert them.
If the main image improves traffic but the page has weak gallery images, unclear messaging, poor reviews, confusing A+ Content, or an uncompetitive offer, additional clicks may not turn into enough sales.
That is why main-image testing should sit inside a larger conversion strategy.
Main-image testing can improve the click, but the rest of the listing still has to close the sale. If traffic is reaching the page without converting, my Amazon Conversion Rate Optimization Guide explains what to review next across the offer, gallery, copy, reviews, and A+ Content.
And when the problem goes beyond the main image, it is worth auditing the full page instead of optimizing one element in isolation. My Amazon Listing Optimization Guide walks through the broader process of improving the title, bullets, gallery, A+ Content, and overall buying experience.
Amazon Main-Image Testing Checklist
Before scheduling the experiment, confirm that:
The ASIN is eligible.
The product belongs to your registered brand.
The current image is correctly assigned as Version A.
Version B meets Amazon’s image requirements.
The images are meaningfully different.
Each image accurately represents the product.
You have written a clear hypothesis.
The correct child ASINs or variations are selected.
The test is scheduled to run long enough.
You know which metrics you will use to judge the result.
You are not planning unnecessary listing changes during the test.
You have another concept ready for the next round.
FAQ
Is Manage Your Experiments free?
Amazon describes Manage Your Experiments as a free tool for eligible professional sellers representing brands enrolled in Brand Registry. Normal Professional selling-plan fees still apply.
How long should an Amazon main-image experiment run?
Amazon recommends eight to ten weeks when choosing a fixed duration. Tests using the “to significance” option may sometimes produce a result in as little as four weeks. Traffic and the difference between the versions can affect the timeline.
How many main images should I test?
I recommend creating at least three strong concepts. My preferred framework uses four images and three sequential experiments.
More concepts can be useful when you have enough traffic and each version tests a legitimate idea.
Can I see CTR in Manage Your Experiments?
Amazon’s current public documentation emphasizes metrics such as sales, conversion, units sold, units sold per unique visitor, sample size, and probability of one version being better. It does not promise a dedicated CTR metric for every image experiment.
Can I test supporting gallery images?
Amazon supports image experimentation beyond the main image in eligible situations, although the available options and variation-family limitations can differ by account and product. Confirm the options shown for your ASIN inside Manage Your Experiments before planning the test.
Should I automatically publish the winner?
Auto-publishing can save time, but I still recommend reviewing the result and final image carefully.
Confirm that the winning image is accurate, compliant, and appropriate for every selected variation before leaving it live.
Stop Guessing and Let the Market Decide
A main image should not win because the founder likes it.
It should not win because the designer thinks it looks cleaner.
It should win because shoppers respond to it.
The process is straightforward:
Research the search results.
Identify what shoppers care about.
Create multiple strategic concepts.
Test A against B.
Keep the winner.
Test it against C.
Then test that winner against D.
Once you have a strong concept, refine it and keep testing.
That is how you turn your main image from a basic product photo into a measurable Amazon sales asset.
Need Better Main-Image Concepts to Test?
The difficult part is not clicking Schedule Experiment.
It is deciding what is worth testing.
Our Amazon Main Image Optimization service combines competitor research, search-results analysis, mobile visibility review, conversion strategy, and multiple creative concepts designed around qualified clicks, not just aesthetics.
If your product is receiving impressions but not enough shoppers are reaching the listing, book an Amazon CRO strategy call and we’ll help you identify what may be holding the click back.
How to A/B Test Amazon Main Images with Manage Your Experiments
Stop guessing which image will win the click.

Your Amazon main image is one of the biggest factors determining whether a shopper clicks your listing or keeps scrolling.
Before they see your gallery images, bullet points, videos, or A+ Content, shoppers compare your main image against every other product in the search results.
That makes the main image one of the first things I test when a product is getting impressions but not enough traffic.
The problem is that most sellers choose their main image based on opinion.
The brand owner likes one version. The designer prefers another. Someone on the team thinks the product should be bigger. Another person wants to show the packaging.
None of those opinions tell you which image shoppers will actually respond to.
That is why I use Amazon’s Manage Your Experiments tool to A/B test different main-image concepts with real shoppers.
In this guide, I’ll show you how to set up a main-image experiment, what concepts are worth testing, how to interpret the results, and how I use my AB4 method to move beyond a single test.
Quick Answer: How Do You A/B Test an Amazon Main Image?
To A/B test an Amazon main image:
Sign in to Seller Central.
Go to Brands and open Manage Experiments.
Select Create a New Experiment.
Choose an image experiment.
Select an eligible ASIN.
Use your current main image as Version A.
Upload the alternate main image as Version B.
Review the experiment settings.
Schedule the experiment.
Let the experiment finish before choosing a winner.
Amazon divides eligible shoppers into groups and shows each group a different version. Once enough data is collected, you can compare performance using metrics such as sales, conversion rate, units sold, units sold per unique visitor, sample size, and the probability that one version performs better.
Do not stop after one experiment.
Create several meaningfully different concepts, keep the winner from each test, and continue testing until you have found the strongest option.
What Is Amazon Manage Your Experiments?

Manage Your Experiments is Amazon’s built-in A/B-testing platform for product-detail-page content.
It can test different versions of:
Product images
Titles
Bullet points
Product descriptions
A+ Content
Brand Story content
Amazon randomly divides shoppers between the two versions instead of changing the content for everyone at once. This creates a cleaner comparison between Version A and Version B.
For a main-image test:
Version A is normally your currently published image.
Version B is the new image you want to test.
The purpose is not simply to find the prettier image.
It is to determine which concept helps produce better business results.
Who Can Use Manage Your Experiments?
To access Manage Your Experiments, you need:
A Professional selling account
A brand enrolled in Amazon Brand Registry
Brand Representative permissions for that brand
An eligible product with enough recent traffic to produce useful results
Amazon determines product eligibility based partly on recent traffic. You can see which ASINs are eligible when you create a new experiment inside Seller Central.
If your ASIN does not appear, it may not currently have enough traffic to generate a reliable test.
That does not mean you should choose an image blindly. You can still use competitor research, customer surveys, and preference-testing tools to narrow down the concepts before the ASIN becomes eligible. Just remember that a preference poll is not the same as an experiment using actual Amazon shopping behavior.
Why Main-Image A/B Testing Matters

The main image mainly controls what happens before the click.
In Amazon search, shoppers can usually see several decision-making elements:
Main image
Title
Price
Reviews
Star rating
Coupon or discount
Delivery estimate
The main image is the largest visual element in that group.
A weak image can make a strong product look generic. A confusing image may attract the wrong shopper. A tiny product render can make the offer look less valuable than competing listings.
That is why I think of your main image as a search-page billboard.
Its job is to:
Explain the product quickly
Communicate the most important value
Stand out appropriately
Attract a qualified shopper
Earn the click
Before creating test concepts, it helps to understand what actually makes a main image stand out in search without becoming misleading or cluttered. I break that down in my Amazon Main Image Optimization Guide, including competitor research, mobile visibility, product sizing, and concept development.
Do Not Test Random Images

A good experiment starts before you open Seller Central.
Do not ask your designer to create four slightly different packshots and assume you have a serious testing strategy.
First, identify what might be holding back the current image.
Search your main keyword and compare your product against the top listings.
Look at:
How much space each product occupies
Which images remain clear on mobile
Whether packaging is included
How quantity or size is communicated
Whether capsules, gummies, powder, accessories, or included items are shown
Which colors stand out
Which images look trustworthy
What every competitor is doing similarly
What important information competitors are missing
Then identify the product’s main selling point.
That might be:
More servings
A higher dose
A larger quantity
Better ingredients
A cleaner formula
A useful bundle
Better packaging
A specific use case
A meaningful certification
Better value
You need a hypothesis before you need a design.
For example:
I believe showing the product and its packaging together will increase sales because the packaging makes the quantity and primary benefit easier to understand in search.
That gives the experiment a purpose.
Main-Image Concepts Worth Testing

The right concepts depend on the product, category, target keyword, and nearby competition.
These are some of the most useful directions to explore.
A Larger Product
Test whether increasing the product’s visual size makes it easier to recognize in search.
This can be effective when the current product looks small or weak next to competitors.
Do not enlarge it so aggressively that the proportions become misleading. The image still needs to set accurate expectations.
Product Plus Packaging
Packaging can provide additional visual space for communicating:
Product type
Quantity
Flavor
Size
Primary benefit
Included items
Test this only when the packaging improves clarity. If it adds clutter without explaining anything, it does not belong.
Product Form
Depending on the category, test showing the actual:
Gummies
Capsules
Powder
Liquid
Product pieces
Accessories
Components
This can make the offer easier to understand without requiring shoppers to open the listing.
Quantity or Size Emphasis
If shoppers care about how much they receive, test making that information easier to notice.
Examples include:
120 capsules
75 servings
1.5 pounds
Three-pack
20-count
Value pack
The information must be accurate and consistent with what the customer will receive.
Bundle Contents
When the product includes several items, test a version that clearly displays the complete bundle.
A shopper should not have to guess whether accessories or additional pieces are included.
Different Color Direction
Color can affect how the image appears beside surrounding products.
In one of my own product experiments, changing the phone color shown with a magnetic wallet produced very different results. The orange version performed better than white, and a later blue version performed better again. That was a useful reminder that the concept I personally expect to win may not be the one shoppers choose.
The lesson is not that blue always performs best.
The lesson is that you do not know until you test.
Ingredient or Flavor Cue
For food, supplements, beauty, and CPG products, an accurate ingredient or flavor cue may help shoppers understand the product faster.
Keep it clean and category-compliant. Do not imply that something is included when it is not.
Make Version A and Version B Meaningfully Different

Amazon specifically recommends creating versions that are significantly different. When the changes are too small, it becomes harder to determine whether any difference in performance came from the content or random variation.
A weak test might compare:
Product moved five pixels
Slightly brighter background
Tiny shadow difference
Almost identical crop
A stronger test might compare:
Product only versus product and packaging
Small render versus larger product
Bottle only versus bottle and capsules
Standard packshot versus quantity-focused concept
White phone versus blue phone
Single product versus full bundle
You should still change one main concept at a time.
If Version B changes the product size, background balance, packaging, color, quantity display, and product arrangement all at once, you may find a winner without learning why it won.
There is a balance:
Different enough to produce a meaningful result
Controlled enough to teach you something useful
How to Set Up a Main-Image Experiment

Amazon’s interface can change, but the current workflow follows this general process.
Step 1: Open Manage Experiments
Sign in to Seller Central.
Hover over Brands in the main navigation and select Manage Experiments. Amazon also provides a direct Manage Your Experiments dashboard for eligible accounts.
Step 2: Create a New Experiment

Select Create a New Experiment.
Choose the image experiment type and select the product you want to test.
Only eligible products will appear.
Step 3: Choose What You Are Testing

Confirm that you are testing the main product image rather than unintentionally changing the supporting gallery (uncheck the “Experiment with supporting images” option).

If the product has several child variations, make sure the correct variation or group is selected.
The exact controls may differ depending on the variation family and current Seller Central interface, so review the selected ASINs carefully before scheduling.
Step 4: Prepare Version A

Version A is normally the image currently published on the listing.
Confirm that this is the correct control image.
Do not change Version A in the middle of the experiment through another listing-management process.
Step 5: Upload Version B
Upload the alternate image and select it as Version B.
Both images should meet Amazon’s current product-image requirements and accurately represent the product.
Amazon’s current workflow lets you upload an image and select it through the file picker while creating the experiment.
Step 6: Add the Experiment Details
Give the experiment a clear name.
Instead of:
Main image test
Use something like:
Creatine Gummies - Bottle Only vs Bottle and Gummies - August 2026
Also record your hypothesis:
Showing the gummies will improve performance because shoppers can understand the product form immediately.
This makes your experiment history far more useful later.
Step 7: Review the Duration and Publishing Settings
Amazon now preselects settings intended to generate results efficiently. Experiments can begin after validation, run until enough information is collected to identify a winner, and automatically publish the winning version when enabled.
Amazon recommends allowing a manually scheduled experiment to run for around eight to ten weeks. With the “to significance” setting, some experiments may reach a result in as little as four weeks, depending on traffic and performance differences.
Do not end the test because one version appears ahead after a few days.
Early results can reverse.
Step 8: Schedule the Experiment

Review everything one final time and select Schedule Experiment.
Amazon will validate the content before the test begins.
You can monitor the experiment from the Manage Your Experiments dashboard.
The AB4 Method

The biggest mistake is running one A/B test and assuming the job is finished.
You only learned which of two images performed better.
You did not prove that the winner is the strongest possible concept.
That is why I use what I call the AB4 method.
Create four strategic concepts:
Image A
Image B
Image C
Image D
Then run the experiments in sequence:
Round 1: A vs B
Test the current image against your first alternate concept.
Keep the winner.
Round 2: Winner vs C
Take the winning image from Round 1 and test it against the third concept.
Keep that winner.
Round 3: Winner vs D
Take the Round 2 winner and test it against the fourth concept.
The final winner has now defeated three alternatives.
This is not the same as proving that no other image could ever perform better, but it gives you far more confidence than choosing one concept based on a design meeting. Riley outlines this exact winner-versus-next-image sequence in his Amazon SEO training.
Once you find a winning concept, you can go deeper.
For example, if the product-plus-packaging concept wins, create new versions of that direction:
Different product arrangement
Larger packaging
Different angle
Different spacing
Different quantity emphasis
Then test those refinements against one another.
How to Analyze the Results

Amazon updates experiment results during the test and provides a full comparison once it finishes.
The current reporting can include:
Probability that one version is better
Units sold
Sales
Conversion rate
Units sold per unique visitor
Sample size
Projected one-year sales impact
Amazon does not always present the experiment as a simple CTR report. Manage Your Experiments is designed to evaluate the broader shopping outcome, including conversion and sales.
That matters because the highest-clicked image is not automatically the best image.
Imagine that Version B attracts more curiosity but creates the wrong expectation. More shoppers click, but fewer of them buy.
That is not necessarily an improvement.
The best main image should:
Earn more attention from the right shopper.
Set an accurate expectation.
Help produce stronger downstream sales performance.
Look at the complete result, not one isolated number.
What If There Is No Clear Winner?
An inconclusive result is still useful.
It may mean:
The images were too similar
The ASIN did not receive enough traffic
The difference did not meaningfully affect shopper behavior
Both concepts performed similarly
The experiment needs more time
Another listing factor is having a stronger influence
Do not force a conclusion that the data does not support.
Keep the existing image if there is no convincing reason to replace it, then develop a more distinct challenger.
Main-Image Testing Is Only One Part of CRO

The main image gets shoppers into the listing.
The listing still has to convert them.
If the main image improves traffic but the page has weak gallery images, unclear messaging, poor reviews, confusing A+ Content, or an uncompetitive offer, additional clicks may not turn into enough sales.
That is why main-image testing should sit inside a larger conversion strategy.
Main-image testing can improve the click, but the rest of the listing still has to close the sale. If traffic is reaching the page without converting, my Amazon Conversion Rate Optimization Guide explains what to review next across the offer, gallery, copy, reviews, and A+ Content.
And when the problem goes beyond the main image, it is worth auditing the full page instead of optimizing one element in isolation. My Amazon Listing Optimization Guide walks through the broader process of improving the title, bullets, gallery, A+ Content, and overall buying experience.
Amazon Main-Image Testing Checklist
Before scheduling the experiment, confirm that:
The ASIN is eligible.
The product belongs to your registered brand.
The current image is correctly assigned as Version A.
Version B meets Amazon’s image requirements.
The images are meaningfully different.
Each image accurately represents the product.
You have written a clear hypothesis.
The correct child ASINs or variations are selected.
The test is scheduled to run long enough.
You know which metrics you will use to judge the result.
You are not planning unnecessary listing changes during the test.
You have another concept ready for the next round.
FAQ
Is Manage Your Experiments free?
Amazon describes Manage Your Experiments as a free tool for eligible professional sellers representing brands enrolled in Brand Registry. Normal Professional selling-plan fees still apply.
How long should an Amazon main-image experiment run?
Amazon recommends eight to ten weeks when choosing a fixed duration. Tests using the “to significance” option may sometimes produce a result in as little as four weeks. Traffic and the difference between the versions can affect the timeline.
How many main images should I test?
I recommend creating at least three strong concepts. My preferred framework uses four images and three sequential experiments.
More concepts can be useful when you have enough traffic and each version tests a legitimate idea.
Can I see CTR in Manage Your Experiments?
Amazon’s current public documentation emphasizes metrics such as sales, conversion, units sold, units sold per unique visitor, sample size, and probability of one version being better. It does not promise a dedicated CTR metric for every image experiment.
Can I test supporting gallery images?
Amazon supports image experimentation beyond the main image in eligible situations, although the available options and variation-family limitations can differ by account and product. Confirm the options shown for your ASIN inside Manage Your Experiments before planning the test.
Should I automatically publish the winner?
Auto-publishing can save time, but I still recommend reviewing the result and final image carefully.
Confirm that the winning image is accurate, compliant, and appropriate for every selected variation before leaving it live.
Stop Guessing and Let the Market Decide
A main image should not win because the founder likes it.
It should not win because the designer thinks it looks cleaner.
It should win because shoppers respond to it.
The process is straightforward:
Research the search results.
Identify what shoppers care about.
Create multiple strategic concepts.
Test A against B.
Keep the winner.
Test it against C.
Then test that winner against D.
Once you have a strong concept, refine it and keep testing.
That is how you turn your main image from a basic product photo into a measurable Amazon sales asset.
Need Better Main-Image Concepts to Test?
The difficult part is not clicking Schedule Experiment.
It is deciding what is worth testing.
Our Amazon Main Image Optimization service combines competitor research, search-results analysis, mobile visibility review, conversion strategy, and multiple creative concepts designed around qualified clicks, not just aesthetics.
If your product is receiving impressions but not enough shoppers are reaching the listing, book an Amazon CRO strategy call and we’ll help you identify what may be holding the click back.
How to A/B Test Amazon Main Images with Manage Your Experiments
Stop guessing which image will win the click.

Your Amazon main image is one of the biggest factors determining whether a shopper clicks your listing or keeps scrolling.
Before they see your gallery images, bullet points, videos, or A+ Content, shoppers compare your main image against every other product in the search results.
That makes the main image one of the first things I test when a product is getting impressions but not enough traffic.
The problem is that most sellers choose their main image based on opinion.
The brand owner likes one version. The designer prefers another. Someone on the team thinks the product should be bigger. Another person wants to show the packaging.
None of those opinions tell you which image shoppers will actually respond to.
That is why I use Amazon’s Manage Your Experiments tool to A/B test different main-image concepts with real shoppers.
In this guide, I’ll show you how to set up a main-image experiment, what concepts are worth testing, how to interpret the results, and how I use my AB4 method to move beyond a single test.
Quick Answer: How Do You A/B Test an Amazon Main Image?
To A/B test an Amazon main image:
Sign in to Seller Central.
Go to Brands and open Manage Experiments.
Select Create a New Experiment.
Choose an image experiment.
Select an eligible ASIN.
Use your current main image as Version A.
Upload the alternate main image as Version B.
Review the experiment settings.
Schedule the experiment.
Let the experiment finish before choosing a winner.
Amazon divides eligible shoppers into groups and shows each group a different version. Once enough data is collected, you can compare performance using metrics such as sales, conversion rate, units sold, units sold per unique visitor, sample size, and the probability that one version performs better.
Do not stop after one experiment.
Create several meaningfully different concepts, keep the winner from each test, and continue testing until you have found the strongest option.
What Is Amazon Manage Your Experiments?

Manage Your Experiments is Amazon’s built-in A/B-testing platform for product-detail-page content.
It can test different versions of:
Product images
Titles
Bullet points
Product descriptions
A+ Content
Brand Story content
Amazon randomly divides shoppers between the two versions instead of changing the content for everyone at once. This creates a cleaner comparison between Version A and Version B.
For a main-image test:
Version A is normally your currently published image.
Version B is the new image you want to test.
The purpose is not simply to find the prettier image.
It is to determine which concept helps produce better business results.
Who Can Use Manage Your Experiments?
To access Manage Your Experiments, you need:
A Professional selling account
A brand enrolled in Amazon Brand Registry
Brand Representative permissions for that brand
An eligible product with enough recent traffic to produce useful results
Amazon determines product eligibility based partly on recent traffic. You can see which ASINs are eligible when you create a new experiment inside Seller Central.
If your ASIN does not appear, it may not currently have enough traffic to generate a reliable test.
That does not mean you should choose an image blindly. You can still use competitor research, customer surveys, and preference-testing tools to narrow down the concepts before the ASIN becomes eligible. Just remember that a preference poll is not the same as an experiment using actual Amazon shopping behavior.
Why Main-Image A/B Testing Matters

The main image mainly controls what happens before the click.
In Amazon search, shoppers can usually see several decision-making elements:
Main image
Title
Price
Reviews
Star rating
Coupon or discount
Delivery estimate
The main image is the largest visual element in that group.
A weak image can make a strong product look generic. A confusing image may attract the wrong shopper. A tiny product render can make the offer look less valuable than competing listings.
That is why I think of your main image as a search-page billboard.
Its job is to:
Explain the product quickly
Communicate the most important value
Stand out appropriately
Attract a qualified shopper
Earn the click
Before creating test concepts, it helps to understand what actually makes a main image stand out in search without becoming misleading or cluttered. I break that down in my Amazon Main Image Optimization Guide, including competitor research, mobile visibility, product sizing, and concept development.
Do Not Test Random Images

A good experiment starts before you open Seller Central.
Do not ask your designer to create four slightly different packshots and assume you have a serious testing strategy.
First, identify what might be holding back the current image.
Search your main keyword and compare your product against the top listings.
Look at:
How much space each product occupies
Which images remain clear on mobile
Whether packaging is included
How quantity or size is communicated
Whether capsules, gummies, powder, accessories, or included items are shown
Which colors stand out
Which images look trustworthy
What every competitor is doing similarly
What important information competitors are missing
Then identify the product’s main selling point.
That might be:
More servings
A higher dose
A larger quantity
Better ingredients
A cleaner formula
A useful bundle
Better packaging
A specific use case
A meaningful certification
Better value
You need a hypothesis before you need a design.
For example:
I believe showing the product and its packaging together will increase sales because the packaging makes the quantity and primary benefit easier to understand in search.
That gives the experiment a purpose.
Main-Image Concepts Worth Testing

The right concepts depend on the product, category, target keyword, and nearby competition.
These are some of the most useful directions to explore.
A Larger Product
Test whether increasing the product’s visual size makes it easier to recognize in search.
This can be effective when the current product looks small or weak next to competitors.
Do not enlarge it so aggressively that the proportions become misleading. The image still needs to set accurate expectations.
Product Plus Packaging
Packaging can provide additional visual space for communicating:
Product type
Quantity
Flavor
Size
Primary benefit
Included items
Test this only when the packaging improves clarity. If it adds clutter without explaining anything, it does not belong.
Product Form
Depending on the category, test showing the actual:
Gummies
Capsules
Powder
Liquid
Product pieces
Accessories
Components
This can make the offer easier to understand without requiring shoppers to open the listing.
Quantity or Size Emphasis
If shoppers care about how much they receive, test making that information easier to notice.
Examples include:
120 capsules
75 servings
1.5 pounds
Three-pack
20-count
Value pack
The information must be accurate and consistent with what the customer will receive.
Bundle Contents
When the product includes several items, test a version that clearly displays the complete bundle.
A shopper should not have to guess whether accessories or additional pieces are included.
Different Color Direction
Color can affect how the image appears beside surrounding products.
In one of my own product experiments, changing the phone color shown with a magnetic wallet produced very different results. The orange version performed better than white, and a later blue version performed better again. That was a useful reminder that the concept I personally expect to win may not be the one shoppers choose.
The lesson is not that blue always performs best.
The lesson is that you do not know until you test.
Ingredient or Flavor Cue
For food, supplements, beauty, and CPG products, an accurate ingredient or flavor cue may help shoppers understand the product faster.
Keep it clean and category-compliant. Do not imply that something is included when it is not.
Make Version A and Version B Meaningfully Different

Amazon specifically recommends creating versions that are significantly different. When the changes are too small, it becomes harder to determine whether any difference in performance came from the content or random variation.
A weak test might compare:
Product moved five pixels
Slightly brighter background
Tiny shadow difference
Almost identical crop
A stronger test might compare:
Product only versus product and packaging
Small render versus larger product
Bottle only versus bottle and capsules
Standard packshot versus quantity-focused concept
White phone versus blue phone
Single product versus full bundle
You should still change one main concept at a time.
If Version B changes the product size, background balance, packaging, color, quantity display, and product arrangement all at once, you may find a winner without learning why it won.
There is a balance:
Different enough to produce a meaningful result
Controlled enough to teach you something useful
How to Set Up a Main-Image Experiment

Amazon’s interface can change, but the current workflow follows this general process.
Step 1: Open Manage Experiments
Sign in to Seller Central.
Hover over Brands in the main navigation and select Manage Experiments. Amazon also provides a direct Manage Your Experiments dashboard for eligible accounts.
Step 2: Create a New Experiment

Select Create a New Experiment.
Choose the image experiment type and select the product you want to test.
Only eligible products will appear.
Step 3: Choose What You Are Testing

Confirm that you are testing the main product image rather than unintentionally changing the supporting gallery (uncheck the “Experiment with supporting images” option).

If the product has several child variations, make sure the correct variation or group is selected.
The exact controls may differ depending on the variation family and current Seller Central interface, so review the selected ASINs carefully before scheduling.
Step 4: Prepare Version A

Version A is normally the image currently published on the listing.
Confirm that this is the correct control image.
Do not change Version A in the middle of the experiment through another listing-management process.
Step 5: Upload Version B
Upload the alternate image and select it as Version B.
Both images should meet Amazon’s current product-image requirements and accurately represent the product.
Amazon’s current workflow lets you upload an image and select it through the file picker while creating the experiment.
Step 6: Add the Experiment Details
Give the experiment a clear name.
Instead of:
Main image test
Use something like:
Creatine Gummies - Bottle Only vs Bottle and Gummies - August 2026
Also record your hypothesis:
Showing the gummies will improve performance because shoppers can understand the product form immediately.
This makes your experiment history far more useful later.
Step 7: Review the Duration and Publishing Settings
Amazon now preselects settings intended to generate results efficiently. Experiments can begin after validation, run until enough information is collected to identify a winner, and automatically publish the winning version when enabled.
Amazon recommends allowing a manually scheduled experiment to run for around eight to ten weeks. With the “to significance” setting, some experiments may reach a result in as little as four weeks, depending on traffic and performance differences.
Do not end the test because one version appears ahead after a few days.
Early results can reverse.
Step 8: Schedule the Experiment

Review everything one final time and select Schedule Experiment.
Amazon will validate the content before the test begins.
You can monitor the experiment from the Manage Your Experiments dashboard.
The AB4 Method

The biggest mistake is running one A/B test and assuming the job is finished.
You only learned which of two images performed better.
You did not prove that the winner is the strongest possible concept.
That is why I use what I call the AB4 method.
Create four strategic concepts:
Image A
Image B
Image C
Image D
Then run the experiments in sequence:
Round 1: A vs B
Test the current image against your first alternate concept.
Keep the winner.
Round 2: Winner vs C
Take the winning image from Round 1 and test it against the third concept.
Keep that winner.
Round 3: Winner vs D
Take the Round 2 winner and test it against the fourth concept.
The final winner has now defeated three alternatives.
This is not the same as proving that no other image could ever perform better, but it gives you far more confidence than choosing one concept based on a design meeting. Riley outlines this exact winner-versus-next-image sequence in his Amazon SEO training.
Once you find a winning concept, you can go deeper.
For example, if the product-plus-packaging concept wins, create new versions of that direction:
Different product arrangement
Larger packaging
Different angle
Different spacing
Different quantity emphasis
Then test those refinements against one another.
How to Analyze the Results

Amazon updates experiment results during the test and provides a full comparison once it finishes.
The current reporting can include:
Probability that one version is better
Units sold
Sales
Conversion rate
Units sold per unique visitor
Sample size
Projected one-year sales impact
Amazon does not always present the experiment as a simple CTR report. Manage Your Experiments is designed to evaluate the broader shopping outcome, including conversion and sales.
That matters because the highest-clicked image is not automatically the best image.
Imagine that Version B attracts more curiosity but creates the wrong expectation. More shoppers click, but fewer of them buy.
That is not necessarily an improvement.
The best main image should:
Earn more attention from the right shopper.
Set an accurate expectation.
Help produce stronger downstream sales performance.
Look at the complete result, not one isolated number.
What If There Is No Clear Winner?
An inconclusive result is still useful.
It may mean:
The images were too similar
The ASIN did not receive enough traffic
The difference did not meaningfully affect shopper behavior
Both concepts performed similarly
The experiment needs more time
Another listing factor is having a stronger influence
Do not force a conclusion that the data does not support.
Keep the existing image if there is no convincing reason to replace it, then develop a more distinct challenger.
Main-Image Testing Is Only One Part of CRO

The main image gets shoppers into the listing.
The listing still has to convert them.
If the main image improves traffic but the page has weak gallery images, unclear messaging, poor reviews, confusing A+ Content, or an uncompetitive offer, additional clicks may not turn into enough sales.
That is why main-image testing should sit inside a larger conversion strategy.
Main-image testing can improve the click, but the rest of the listing still has to close the sale. If traffic is reaching the page without converting, my Amazon Conversion Rate Optimization Guide explains what to review next across the offer, gallery, copy, reviews, and A+ Content.
And when the problem goes beyond the main image, it is worth auditing the full page instead of optimizing one element in isolation. My Amazon Listing Optimization Guide walks through the broader process of improving the title, bullets, gallery, A+ Content, and overall buying experience.
Amazon Main-Image Testing Checklist
Before scheduling the experiment, confirm that:
The ASIN is eligible.
The product belongs to your registered brand.
The current image is correctly assigned as Version A.
Version B meets Amazon’s image requirements.
The images are meaningfully different.
Each image accurately represents the product.
You have written a clear hypothesis.
The correct child ASINs or variations are selected.
The test is scheduled to run long enough.
You know which metrics you will use to judge the result.
You are not planning unnecessary listing changes during the test.
You have another concept ready for the next round.
FAQ
Is Manage Your Experiments free?
Amazon describes Manage Your Experiments as a free tool for eligible professional sellers representing brands enrolled in Brand Registry. Normal Professional selling-plan fees still apply.
How long should an Amazon main-image experiment run?
Amazon recommends eight to ten weeks when choosing a fixed duration. Tests using the “to significance” option may sometimes produce a result in as little as four weeks. Traffic and the difference between the versions can affect the timeline.
How many main images should I test?
I recommend creating at least three strong concepts. My preferred framework uses four images and three sequential experiments.
More concepts can be useful when you have enough traffic and each version tests a legitimate idea.
Can I see CTR in Manage Your Experiments?
Amazon’s current public documentation emphasizes metrics such as sales, conversion, units sold, units sold per unique visitor, sample size, and probability of one version being better. It does not promise a dedicated CTR metric for every image experiment.
Can I test supporting gallery images?
Amazon supports image experimentation beyond the main image in eligible situations, although the available options and variation-family limitations can differ by account and product. Confirm the options shown for your ASIN inside Manage Your Experiments before planning the test.
Should I automatically publish the winner?
Auto-publishing can save time, but I still recommend reviewing the result and final image carefully.
Confirm that the winning image is accurate, compliant, and appropriate for every selected variation before leaving it live.
Stop Guessing and Let the Market Decide
A main image should not win because the founder likes it.
It should not win because the designer thinks it looks cleaner.
It should win because shoppers respond to it.
The process is straightforward:
Research the search results.
Identify what shoppers care about.
Create multiple strategic concepts.
Test A against B.
Keep the winner.
Test it against C.
Then test that winner against D.
Once you have a strong concept, refine it and keep testing.
That is how you turn your main image from a basic product photo into a measurable Amazon sales asset.
Need Better Main-Image Concepts to Test?
The difficult part is not clicking Schedule Experiment.
It is deciding what is worth testing.
Our Amazon Main Image Optimization service combines competitor research, search-results analysis, mobile visibility review, conversion strategy, and multiple creative concepts designed around qualified clicks, not just aesthetics.
If your product is receiving impressions but not enough shoppers are reaching the listing, book an Amazon CRO strategy call and we’ll help you identify what may be holding the click back.

Riley Bennett
Amazon Strategist, 7-Figure Seller & Founder of AmazingCreative
Riley has been selling on Amazon and working with marketplace brands since 2015. He founded AmazingCreative to help brands improve their listings through stronger creative, clearer messaging, and conversion-focused strategy.
He has worked with more than 300 brands across Amazon CRO, PPC, SEO, product launches, and marketplace growth.
Since 2015 · Trusted by 300+ Brands · 7-Figure Amazon Seller